Friday, August 19, 2016

Jersey in spring boot – Hello world example

Simply speaking:

JAX-RS, namely Java API for RESTful Service,  is from JSR 311 (obsolete) and JSR 339 (download here).

Jersey is an reference implementation of JAX-RS.

Spring boot sure can implement REST service without Jersey by using the controller way (@RestConroller). Also, jersey can be chosen for exposing the RESTful services.

This is a hello world level example of using Jersey with spring boot to provide RESTful services.

0. what you need

In this demo, following are used:

  • java 8
  • maven 3.2
  • spring boot 1.4.0.RELEASE

Jersey is included in spring boot release.

1. Maven pom.xml

Only one dependency is needed.

<?xml version="1.0" encoding="UTF-8"?>
<project xmlns="http://maven.apache.org/POM/4.0.0" xmlns:xsi="http://www.w3.org/2001/XMLSchema-instance"
  xsi:schemaLocation="http://maven.apache.org/POM/4.0.0 http://maven.apache.org/xsd/maven-4.0.0.xsd">
  <modelVersion>4.0.0</modelVersion>

  <groupId>com.shengwang.demo</groupId>
  <artifactId>rest-versioning</artifactId>
  <version>1.0</version>
  <packaging>jar</packaging>

  <name>rest-versioning</name>
  <description>Demo project for spring boot jersey rest</description>

  <parent>
    <groupId>org.springframework.boot</groupId>
    <artifactId>spring-boot-starter-parent</artifactId>
    <version>1.4.0.RELEASE</version>
    <relativePath/>
  </parent>

  <properties>
    <java.version>1.8</java.version>
  </properties>

  <dependencies>

    <dependency>
	  <!-- only dependency needed -->
      <groupId>org.springframework.boot</groupId>
      <artifactId>spring-boot-starter-jersey</artifactId>
    </dependency>

  </dependencies>

  <build>
    <plugins>
      <plugin>
        <groupId>org.springframework.boot</groupId>
        <artifactId>spring-boot-maven-plugin</artifactId>
      </plugin>
    </plugins>
  </build>
</project>

2. Java classes

In this hello world example, there are 5 classes totally.

  • Main class
  • POJO model class
  • Service
  • Jersey configuration
  • Endpoint

They will be shown one by one. The Jersey configuration and Endpoint class are more interesting, but for the completion for the demo, all classes are listed below.

2.1 Main class

This class is just a trival main class from spring boot.

package com.shengwang.demo;

import org.springframework.boot.SpringApplication;
import org.springframework.boot.autoconfigure.SpringBootApplication;

@SpringBootApplication
public class SpringBootJerseyApplication {

  public static void main(String[] args) {
    SpringApplication.run(SpringBootJerseyApplication.class, args);
  }
}

2.2.  POJO model

For demo usage. A model class is created. It’s just a POJO.

package com.shengwang.demo.model;

public class User {

  private String name;
  private int age;

  public User(String name, int age) {
    this.name = name;
    this.age = age;
  }
  
  // setter, getter ignored
}

2.3 Service class

A demo class just return a User object by a userId.

package com.shengwang.demo.service;

import com.shengwang.demo.model.User;
import org.springframework.stereotype.Service;
import javax.annotation.PostConstruct;
import java.util.HashMap;
import java.util.Map;

@Service
public class UserService {
  private Map<String,User> users;

  @PostConstruct
  private void loadUser() {
    users = new HashMap<>();
    users.put("1",new User("Tom",20));
    users.put("2",new User("Jerry",19));
  }

  public User findById(String id) {
    return users.get(id);
  }
}

2.4 Jersey configuration

package com.shengwang.demo;

import com.fasterxml.jackson.databind.ObjectMapper;
import org.glassfish.jersey.server.ResourceConfig;
import org.springframework.beans.factory.annotation.Autowired;
import org.springframework.stereotype.Component;

import javax.ws.rs.ApplicationPath;
import javax.ws.rs.ext.ContextResolver;
import javax.ws.rs.ext.Provider;

@Component
@ApplicationPath("/v1")
public class JerseyConfig extends ResourceConfig {

  @Autowired
  public JerseyConfig(ObjectMapper objectMapper) {
    // register endpoints
    packages("com.shengwang.demo");
    // register jackson for json 
    register(new ObjectMapperContextResolver(objectMapper));
  }

  @Provider
  public static class ObjectMapperContextResolver implements ContextResolver<ObjectMapper> {

    private final ObjectMapper mapper;

    public ObjectMapperContextResolver(ObjectMapper mapper) {
      this.mapper = mapper;
    }

    @Override
    public ObjectMapper getContext(Class<?> type) {
      return mapper;
    }
  }
}

The JerseyConfig extends from jersey ResourceConfig, just register the endpoints and jackson for json.

2.5 Endpoint

Just like the spring controller, the jersey endpoint provides the URL mapping.

package com.shengwang.demo.endpoint;

import com.shengwang.demo.model.User;
import com.shengwang.demo.service.UserService;
import org.springframework.beans.factory.annotation.Autowired;
import org.springframework.stereotype.Component;

import javax.ws.rs.GET;
import javax.ws.rs.Path;
import javax.ws.rs.PathParam;
import javax.ws.rs.Produces;
import javax.ws.rs.core.MediaType;


@Component
@Path("/users")
public class DemoEndpoint {

  @Autowired
  private UserService userService;

  @GET
  @Path("/{id}")
  @Produces(MediaType.APPLICATION_JSON)
  public User getEventVersion1(@PathParam("id") String id) {
    return userService.findById(id);
  }
}

Now everything is ready, the whole project looks like below.

Capture

3. Run it

Start the spring boot application from your IDE, and access the url from a brower. Here is the json result you get:

image

Thursday, April 7, 2016

How to dump all dependencies of a maven project

Although it's not common but it really happens in real life.  Usually maven  already automatically downloads all dependencies to local repository, and for some reason you want to get some or all  dependency jar files of this project.  For example you final package is a executable jar but not a "contain-all" uber executable jar. You only need to deploy these dependencies jars once on running host.  This make building process much faster than create a uber executable jar by shade plugin.

Run following command in project home directory (pom.xml in the current direcotry)

mvn dependency:copy-dependencies

Now you will find all dependency jar files get copied to directory target/dependency, like the following snapshot.

image

Wednesday, April 6, 2016

Understand <optional>true</optional> in maven dependency

In pom's dependency , sometimes there's  <optional> true</option>. What does this mean? Why and when do you need to set this?

1. Meaning of <optional>

In short, if project D depend on project C, Project C optionally depend on project A, then project D do NOT depend on project A.

image

Since project C has 2 classes use some classes from project A and project B. Project C can not get compiled without dependencies on A and B. But these two classes are only optional features, which may not be used at all in project D, which depend on project C. So to make the final war/ejb package don't contain unnecessary dependencies, use <optional> to indicate the dependency is optional, be default will not be inherited by others.

What happens if project D really used OptionaFeatureOne in project C? Then in project D's pom, project A need to be explicitly declared in the dependencies section.

image

If optional feature one is used in project D, then project D's pom need to declare dependency on project A to pass compile. Also, the final war package of project D doesn't contain any class from project B, since feature 2 is now used.

2. Practical example

A practical example of using <optional> label is spring-boot-actuator. For example in spring-boot-actuator 1.3.3 release pom file, there are 20+ dependencies are optional, cause sprint-boot don't want to squeeze unnecessary jars into your final war package. Any project uses spring boot actuator will not have these 20+ jars in the final package by default. But if you do have want used some features, e.g. add a Timer metrics to meature the TPS of your web app, then you need to explicitely add dependency to metrics again.

image

Tuesday, April 5, 2016

liquibase - helloworld example

Liquibase is a dabasebase chane management tool. Rather than writing SQL directly against the database to create, update or drop database objects, developers define their desired database changes in XML files.

Any change to database are grouped into "ChangeSet", the best practice is one changeset per modification to make roll back easily. Changes to database can be taged. e.g, you can tag you database structure to 1.0 after first release. Later, when some patches are made and ver 1.1 is release, you can tag all changes up to now to 1.1. (If it's not very clear now, it's ok, see the examples below will make it more obvious). With the help of those tags, you can easy rollback you database structure back to a certain version. (Also, liquibase can roll back without tags).

One notion need to be clarified first,  liquibase only manage schema changes of your database, e.g. add extra index or rename a column, the data in the tables are not managed!

1. Basic concepts

ChangeSet is a logic group in which you can put any real operation. For example, a change set can has operations to create a table, rename a column, add foreign key or any other database operations. 

How does liquibase identify a change set? changeset is identified by 3 elements, id + author + change log filename(with path).  When run liquibase first time, it will create 2 extra tables in your database, databasechangelog and databasechangeloglock. 
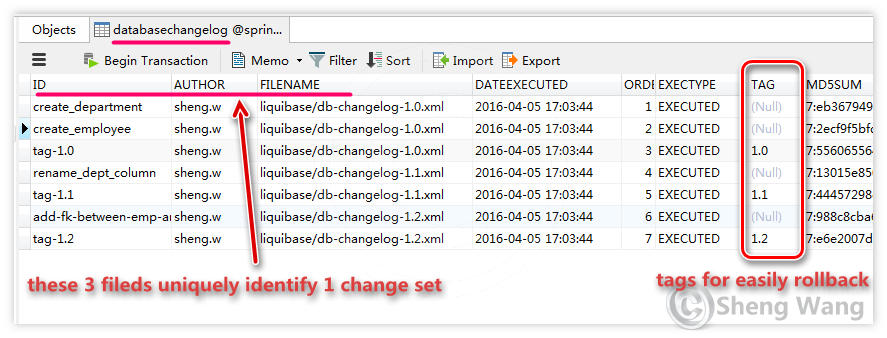
image

Liquibase will go through changelog xml file, see if there are some change sets not in this table. If found, execute them and put a recored in this table. By using this table, liquibase can trace which changeset has already executed, which changeset is new.  Tags can be used to specifiy a version you want to go, see below example for more. To use liquibase, you don't need to touch this databasechangelog table, but it can help you understand how liquibase works.

To use liquibase, you also need a change log file, in which all database operations are defined.  In this tutorial, liquibase 3.4 and xml based change log is used.

2.  How to run liquibase

Before the demo starts, let's first see how to run liquibase. In this tutorial, 2 ways are introduced, by command line or by maven plugin.

To run liquibase in command line, you need

  • download liquibase, unpack it executable file liquibase or liquibase.bat in the package.
  • download your database jdbc driver to you local disk.

To run liquibase by using maven, you need:

  • change pom file, add liquibase-maven-plugin

Since in pom.xml the jdbc driver dependency has already be added, you don't need the external jdbc jar file.

You can choose either command line or maven plugin to run liquibase. I personally perfer by maven plugin, cause the command can be much shorter.

3. Hello world demo for liquibase usage

First let's create a maven project in eclipse. In this demo there's no java class. We emphase on how to use liquibase.  The hierarchy of the demo project looks like below.

image

Let's go through these files one by one.

3.1 pom.xml

First the pom.xml, to add liquibase plugin. If you decide no to use maven to run liquibase,  this step can be omitted.

<project xmlns="http://maven.apache.org/POM/4.0.0" xmlns:xsi="http://www.w3.org/2001/XMLSchema-instance"
  xsi:schemaLocation="http://maven.apache.org/POM/4.0.0 http://maven.apache.org/xsd/maven-4.0.0.xsd">
  <modelVersion>4.0.0</modelVersion>

  <groupId>com.sanss.demo</groupId>
  <artifactId>liquibase-helloworld-demo</artifactId>
  <version>1.0</version>
  <packaging>jar</packaging>

  <name>liquibase-helloworld-demo</name>
  <url>http://maven.apache.org</url>

  <properties>
    <project.build.sourceEncoding>UTF-8</project.build.sourceEncoding>
  </properties>

  <dependencies>
    <!-- MySQL -->
    <dependency>
      <groupId>mysql</groupId>
      <artifactId>mysql-connector-java</artifactId>
      <version>5.1.6</version>
    </dependency>

  </dependencies>

  <build>
    <finalName>liquibase-helloworld-demo</finalName>
    <plugins>
      <!-- Use Java 1.7 -->
      <plugin>
        <groupId>org.apache.maven.plugins</groupId>
        <artifactId>maven-compiler-plugin</artifactId>
        <version>2.5.1</version>
        <configuration>
          <source>1.7</source>
          <target>1.7</target>
        </configuration>
      </plugin>

      <!-- User liquibase plugin -->
      <plugin>
        <groupId>org.liquibase</groupId>
        <artifactId>liquibase-maven-plugin</artifactId>
        <version>3.4.2</version>
        <configuration>
          <propertyFile>liquibase/liquibase.properties</propertyFile>
          <changeLogFile>liquibase/db-changelog-master.xml</changeLogFile>
        </configuration>
        <!--  I personally prefer run  it manually
        <executions>
          <execution>
            <phase>process-resources</phase>
            <goals>
              <goal>update</goal>
            </goals>
          </execution>
        </executions>
        -->
      </plugin>
    </plugins>
  </build>
</project>

I personally perfer no to bind it to any maven build lifecycle, but invoke it manually. There are 2 files configured in this plugin, "peroperties file" defines all parameter to connect a database. "changeLogFile" is the file from which it read the change sets.

3.1 liquibase.properties

This file has all connection parameters.  Here is the liquibase.properites file in this demo.

# MySQL
driver=com.mysql.jdbc.Driver
url=jdbc:mysql://localhost:3306/spring
username=root
password=yourPwdToDatabase

Nothing fancy here, just common database connection parameters.

3.2 ChangeLog files

In this demo, change log files are in xml format. Other avaiable formats are json and yaml.

The official recommand best practice is always using a xxxx-master.xml file as an entry file.  This is also the file set in the maven plugin.  In this db-changelog-master.xml file, there's no real logic defined, only a bunch of includes.

<databaseChangeLog xmlns="http://www.liquibase.org/xml/ns/dbchangelog"
  xmlns:xsi="http://www.w3.org/2001/XMLSchema-instance"
  xsi:schemaLocation="http://www.liquibase.org/xml/ns/dbchangelog
                        http://www.liquibase.org/xml/ns/dbchangelog/dbchangelog-3.4.xsd">

  <include file="liquibase/db-changelog-1.0.xml"/> 
  <include file="liquibase/db-changelog-1.1.xml"/> 
  <include file="liquibase/db-changelog-1.2.xml"/> 
</databaseChangeLog>

The included files have all change sets.  Suppose the file db-changelog-1.0.xml is the database structure for release version 1.0.

<databaseChangeLog xmlns="http://www.liquibase.org/xml/ns/dbchangelog"
  xmlns:xsi="http://www.w3.org/2001/XMLSchema-instance"
  xsi:schemaLocation="http://www.liquibase.org/xml/ns/dbchangelog
                        http://www.liquibase.org/xml/ns/dbchangelog/dbchangelog-3.4.xsd">

  <changeSet id="create_department" author="sheng.w">
    <createTable tableName="department">
      <column name="id" type="int">
        <constraints primaryKey="true" nullable="false" />
      </column>
      <column name="name" type="varchar(50)">
        <constraints nullable="false" />
      </column>
    </createTable>
  </changeSet>

  <changeSet id="create_employee" author="sheng.w">
    <createTable tableName="employee">
      <column name="id" type="int">
        <constraints primaryKey="true" nullable="false" />
      </column>
      <column name="emp_name" type="varchar(50)">
        <constraints nullable="false" />
      </column>
      <column name="dept" type="int"/>
    </createTable>
  </changeSet>

  <changeSet id="tag-1.0" author="sheng.w">
    <tagDatabase tag="1.0" />
  </changeSet>

</databaseChangeLog>

There are 3 change sets in our 1.0 database schema. Two tables are created and a tag for version 1.0 is added in the end. Every change set has an id and an author.  This xml file demostrate how to create table and primary key for it. The result up to version 1.0 is 2 tables in the database.

image

Let suppose later on, 2 new versions are released with a little change to the database, 1.1 and 1.2.  Every version has a xml file, defining what has changed since last time. The db-changelog-1.1.xml change column 'name' of table 'department' to 'dept_name'

<databaseChangeLog xmlns="http://www.liquibase.org/xml/ns/dbchangelog"
  xmlns:xsi="http://www.w3.org/2001/XMLSchema-instance"
  xsi:schemaLocation="http://www.liquibase.org/xml/ns/dbchangelog
                        http://www.liquibase.org/xml/ns/dbchangelog/dbchangelog-3.4.xsd">

  <changeSet id="rename_dept_column" author="sheng.w">
    <renameColumn tableName="department" oldColumnName="name" newColumnName="dept_name" columnDataType="varchar(50)"/>
  </changeSet>
  
  <changeSet id="tag-1.1" author="sheng.w">
    <tagDatabase tag="1.1" />
  </changeSet>

</databaseChangeLog>

The result up to 1.1 in database is
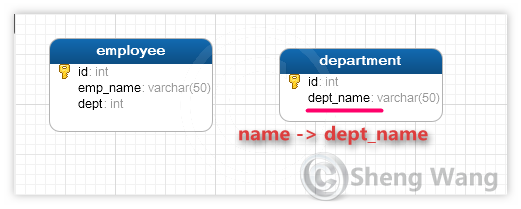
image

Later in version 1.2, one index adds to empolyee table, one foreign key adds between employee and department.

<databaseChangeLog xmlns="http://www.liquibase.org/xml/ns/dbchangelog"
  xmlns:xsi="http://www.w3.org/2001/XMLSchema-instance"
  xsi:schemaLocation="http://www.liquibase.org/xml/ns/dbchangelog
                        http://www.liquibase.org/xml/ns/dbchangelog/dbchangelog-3.4.xsd">

  <changeSet id="add-fk-between-emp-and-dept" author="sheng.w">
    <addForeignKeyConstraint constraintName="fk_emp_dept"
      baseTableName="employee" baseColumnNames="dept" referencedTableName="department"
      referencedColumnNames="id" onDelete="CASCADE" onUpdate="CASCADE" />
  </changeSet>
  
  <changeSet id="add_index" author="sheng.w">
    <createIndex tableName="employee" indexName="idx_exp_name">
      <column name="emp_name"/>
    </createIndex>
  </changeSet>
  
  <changeSet id="tag-1.2" author="sheng.w">
    <tagDatabase tag="1.2" />
  </changeSet>

</databaseChangeLog>

Up to version 1.2, the database looks like below.

image

4. Understand version control of liquibase


Let's now demostrate the 'version control' function of liquibase. Suppose at beginning we have a clean database with nothing in it. The database change log has 3 versions, 1.0, 1,1 and 1.2 defined in previouse chapter. latest version is 1.2.

  • version 1.0, create 2 tables
  • version 1.1, change column name of table department
  • version 1.2, add foreign key and index

4.1 Apply change log to database until latest

First let create database schema to current latest version.  Using command line:

liquibase  --defaultsFile=src/main/resources/liquibase/liquibase.properties \
           --classpath="d:\mysql-connector-java-5.1.6.jar;D:\spring-learning\liquibase-helloworld-demo\target\liquibase-helloworld-demo.jar"  \
           --changeLogFile=liquibase/db-changelog-master.xml   \
           update

The defaultsFile specify the location of properties file for database connection. classpath specify where to find all necessary java file and xml change log files. Here are 2 jar files, one is mysql jdbc driver, the other is the jar of our demo, from which to read the changelog xml file. changeLogFile specify the file name of change log.  update is the command for liquibase, to update database according to the xml change log file.
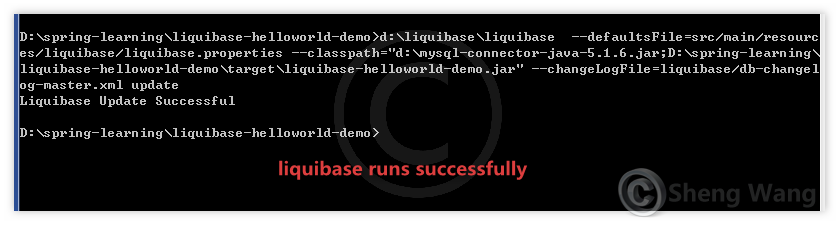
image

Now check the database, in databasechangelog table, all change set are executed.

image

I personally like to run liquibase by maven, because the command is much shorter. The following maven command is equivalent to the previsou command line.

mvn liquibase:update

image

4.2 Rollback database to version 1.0

For some reason you want to roll back you database to verion 1.0.  You can achieve that by command line

liquibase  --defaultsFile=src/main/resources/liquibase/liquibase.properties \
           --classpath="d:\mysql-connector-java-5.1.6.jar;D:\spring-learning\liquibase-helloworld-demo\target\liquibase-helloworld-demo.jar"  \
           --changeLogFile=liquibase/db-changelog-master.xml   \
           rollback 1.0

or by maven command

mvn liquibase:rollback -Dliquibase.rollbackTag=1.0

These 2 ways to are equivalent, just pay attention to how to specify the version tag

image

If you check the databasechangelog table, you will found the changeset after 1.0 are all gone.

image

The tables are also revers to what they looks like in verion 1.0, now foreign key and with orignal column name.

image

4.3 apply change log to a specified version

Now the database is in status 1.0, and you want to apply 1.1 to it. you can do that by following command.

liquibase  --defaultsFile=src/main/resources/liquibase/liquibase.properties \
           --classpath="d:\mysql-connector-java-5.1.6.jar;D:\spring-learning\liquibase-helloworld-demo\target\liquibase-helloworld-demo.jar"  \
           --changeLogFile=liquibase/db-changelog-master.xml   \
           updateToTag 1.1

By using sub command updateToTag, you can update database to a certain version tag.

image

The above command line also equals to following maven command:

mvn liquibase:update -Dliquibase.toTag=1.1

Let's verify the database.
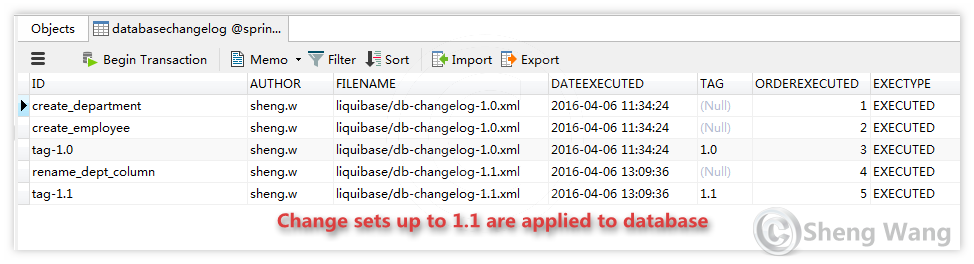
image

Tables ae also in the 1.1 status, no 1.2 foreign key yet, but get 1.1 column rename done.

image

Now you should have some feelings on how liquibase can do the 'version control'

5. Generate ChangeLog from existent tables

If you already have everything configured in database by hand or sql. You can use liqubase to generate change log file for you, then you can keep working based on the generated xml.

By command line:

liquibase  --defaultsFile=src/main/resources/liquibase/liquibase.properties \
           --classpath="d:\mysql-connector-java-5.1.6.jar;D:\spring-learning\liquibase-helloworld-demo\target\liquibase-helloworld-demo.jar"  \
           --changeLogFile=d:\output.xml   \
           generateChangeLog

The changeLogFile is a filename to be created.  The file name must end with ".xml", ".json" or ".yaml".

By maven plugin:

mvn liquibase:generateChangeLog -Dliquibase.outputChangeLogFile=d:\output.xml

The options to specify output name are different in command line and maven plugin. After running you should be able to find newly create d:\output.xml file

6. Recap

Now you should be able to:

  • understand how liquibase workds
  • how to create table, pk, fk, index in xml format in change log file
  • how to apply change log to datebase
  • how to rollback and do version control with liquibase
  • how to generate change log from existent tables

Thursday, March 31, 2016

How does spring's DispatcherServlet work

In Spring webmvc, there is a specifial servlet which is the portal between Servlet container and Spring webmvc framework. It's the DispatcherServlet. A spring web application usually maps all requst to this DispatcherServlet.

A servlet's job is take in a HttpServletRequest, do all the business process and finally return a HttpServletResponse. 

1. Basic process flow of DispatcherServlet

How does DispatcherServlet work

The most important components for understanding DispatcherServlet are 4 interfaces, HandlerMapping, HandlerAdapter, ViewResolver and View. Every interface has ONE core method.  So in short, you can think only 4 methods get main logic done in DispatcherServlet. The lines in above chart also show how previous method affects latter ones.

2. More description

2.1 HandlerMapping

In a spring web application, usually there are a lot of @RequstMapping annotated methods within many @Controller annotated classes. HandlerMapping solve this problem: "Which method in which class should be used to process this current request?" Spring has default HandlerMapping instances built in. For example in spring 4.2.3.RELEASE, BeanNameUrlHandlerMapping and DefaultAnnotationHandlerMapping are used by default. Here are the tyep hierarchy of HandlerMapping.

image

In the HandlerMapping hierarchy, 2 classes are default in DispatcherServlet, although one of them is deprecated. Spring document recommand to use the RequestMappingHandlerMapping to replace the deprecated DefaultAnnotationHandlerMapping.

The returned type of getHandler(…) HandlerExecutionChain. HandlerExecutionChain is a combination of 1 handler + 1 or more interceptors. You can think it as a wrapper of the real handler. One thing to notice is the type of handler is Object, which means a handler to process the income request can be any class! That's the ultimate flexibility spring provides.

Also since the handler type is Object, how DispatcherServlet use it, since type Object expose no real business methods. How to use this "Object handler" to process http request? That's exactly what HandlerAdapter does.

2.2 HandlerAdapter

The key method in HandlerAdapter interface is handle(…, Object handler). The last parameter is the "Object handler" that returned from HandlerMapping, through a wrapper class, HandlerExecutionChain. In this handle method, method of a @Controller class finally get invoked.

image

One thing need to notice is that HandlerMapping and HandlerAdapter usually are closely coupled. All though the typeof  HandlerMapping returned handler is Object in method signature, it's actually some type that only be recognized by a certain HandlerAdapter implementation.  For example,  the handler that returned by RequestMappingHandlerMapping is actually a instance of org.springframework.web.method.HandlerMethod. Only RequestMappingHandlerAdapter knows how to invoke the HandlerMethod.

The return type of a HandlerAdpater's handle(…) method is ModelAndView. As the name says, it has mode and view( or view name) in it.

2.3 ViewResolver

The task for ViewResolver is to find View instance by view's name. The return type of method resolveViewName(…) is View.

image

2.4 View

The key mothod of view instance is render(Map<String,?> model, …), in here the final html result back to user is created. The first parameter is the model data used to create page.  Up to now the main flow of processing an income Http request is over, the created final html page will be send back by servlet container.

3. More

Besides all above interfaces. Another important interface you many come into contact with is HandlerExceptionResolver.

image

If you want to set a default view for all Exceptions or set different views for different types of Excpetion,  extend from SimpleMappingExceptionResolver is very convenient.

See tutorial "Exception handling in spring mvc/rest application" on how to take care of exceptions in Spring webmvc.

What are default handlers/resolvers in Spring DispatcherServlet

Spring webmvc's DispatcherServlet rely on several important notions.

  • HandlerMapping  - find which controller's which method to process current http request.
  • HandlerAdapter - use HandlerMapping's result, actually make performe the request handling, return a ModelAndView object
  • ViewResolver - find view object by view's name in HandlerAdaper's return. This one with previous 2 are the main logic of spring's DispatcherServlet.
  • HandlerExceptionResolver - find correct method to handle any exception occured in previous process.
  • LocaleResolver - resolve Locale
  • ThemeResolver - find theme

The first 4 are the key conponents in spring webmvc's DispatcherServlet.

Here is how can you find out the default values for a certain spring webmvc version.  All these default values are defined in a properties file, DispatcherServlet.properties, in the same directory with DispatcherServlet class.  So in Eclipse maven project, you can simple open the spring mvc package and open this file from the maven dependencies like below.

image

Tuesday, March 29, 2016

How to use distributed JMeter to test netty server performance

JMeter is good at performance testing. Usually, we often need more than one hosts to send traffic to one server to see how the sever behaves. This Many-To-One test scenario is called distributed testing.  In JMeter's world, the hosts, which generate traffic,  are called 'jmeter server'. You can think them as slaves. The one, on which you setup test plan and control the start/stop of others, is called 'jmeter client' . You can think this only one as master.

image

Netty is a high performanc NIO framework. In this demo, a simple Echo server written with Netty 4 is what's going to be tested.  This demo use 5 other hosts to generate traffic to the echo server with long connection.  Everyone establishes 20,000 connections to the server and 100,000 connections totally for 5 hosts.

This article wants to bring you:

  1. Basic concepts of JMeter. like Thread group, Logic Controller, Sampler, Timer and Listener,
  2. How to setup a jmeter testplan with loop, thread group, timer, sampler and listeners
  3. How to run jmeter in distributed test
  4. How to read the test result.
  5. Have a basic understanding of netty's performance. Since only 5 hosts used to generate traffic,  we can't fully show the capacity of the server, but only some idea of the workload in 100,000 connections. 

The JMeter version used in this article is 2.13. The server under test works as an Echo server, just send back what is recieved. The Echo server's code can be found in the end of this article.

1. JMeter basic elements

Every test you run is called a 'test plan', it's a container of other elements.  In a 'test plan', there is usually a 'thread group', which defines the concurrency of your test, like how many thread you want to use to run the 'sampler'.

What is 'sampler'? it's kinda of a real action the test performs, like send out a http request, a tcp request or make a JDBC connection.  'Timer' can help your test wait for some time before perform another action. The name of 'Listener' is a little abstract, but what 'listener' do is just show you the result of the test.  You can have more than one listeners to show the result in different format. e.g. in table or in chart.

JMeter also bunch of 'logic controller' to help you control test logic. In this demo, loop is used to send TCP request repeatedly.

2.Config JMeter test plan.

Test plan is the running unit of JMeter. It has all the test logic defined in it. In distributed testing, this test plan only need to be defined once on the master, and will be submitted to all slaves hosts automatically.

Let's define a test plan to send tcp request repeatly.  The steps are common for other kind of tests.

2.1 Add 'Thread Group'

Right click the test plan and add a thread group.

image

The default thread group only have 1 thread. Change it to 20,000.

image

2.2 Add Loop

we need a thread send tcp requst, recieve the response, then wait for a few seconds and send again. So we need a loop. In this loop we send tcp request and sleep.  Right click the thread group, add loop controller.

image

For this demo, let's choose loop forever.

image

2.3 Add Sampler

Now we have a big goup of thread ready to do something. Sampler defines what the real task is.  Right click on the loop controller, add a tcp sampler.

image

The tcp sampler needs some configuration. 

image

Besides the ip and port of the server, there are 3 places need to config. First re-use connection for 'long connection'. Secondly set String 'send message\n'  as the payload sent to server. Finally, set the EOL byte, jmeter default is 0x00, since we send string message, '\n' is the delimer for every message.

2.4 Add timer

Add a wait after each tcp request. Right click TCP sampler, add a constant timer.

image

Change the delay to 5000 ms.

image

Now the test logic is done, but we need to add listerner to check the test result.

2.5 Add listeners

We add 2 listeners by right click on the test plan.  One is 'Aggregate Report' to see the statistic result of test. The other listener dispaly response time in line chart. (It's a jmeter plugin from the plugin standard set, see http://jmeter-plugins.org/) . The test plan is ready to run, now it looks like below. 

image

3. Run the test locally

Select 'Run' ->'Start', let's run the test locally.  We can see the test result from listeners. The 'Aggregate Report' listener looks like below.

image

The 'Response Times Over Time' listener has the response time as a line chart.

image

So far so good. The sever seems can handle client from 1 host very easily. Next we are going to add more host to generate traffice. This's so-called distributed testing.

4. Run the test remotely

4.1 Prerequisition

  • Every slave hosts has same version jmeter install. (ver 2.13 in this demo)
  • all host in the same subnet to reduce the network delay.

4.2 Change properties file of 'master' jmeter

Modify ${JMeter_Install_Dir}/bin/jmeter.properties file, add all slaves' ip

image

Also in this file, change jmeter mode to 'StrippedAsynch' to reduce master's workload. This's necessary when play with large concurrency performance test.

image

Remember only change this on the master's host.  Now if start the jmeter on master host, you can see the slaves from menu.

image

Now the master, or we can say jmeter client,  is ready. 

4.3 Start JMeter engine on every slave host

Run 'jmeter-server' command on every slave hosts.

image

4.4 Run remotely

On master, click  run remote all button.

image

Very soon you will find the active thread goes up to 100k (20k x 5 slaves)

image

Now the test result looks like below.

image

image

Check  the server's workload, cpu usage is still quite low. On our 2CPU server ( Intel Xeon E5-27750 2.0G 20M Cache, total 32 thread cores), only about 2 cores are used. 

image

Although the echo server has no real logic, the nice performance of Netty framework is impressive.

5. More

Here are the source of our Netty 4 echo server.  It has 2 classes. First the ServerHandler.java

package com.shengwang.demo;

import io.netty.channel.ChannelHandlerContext;
import io.netty.channel.ChannelInboundHandlerAdapter;

public class ServerHandler extends ChannelInboundHandlerAdapter {

  @Override
  public void channelRead(ChannelHandlerContext ctx, Object msg) throws Exception {
    ctx.writeAndFlush(msg);  // loop message back
  }
}

Then the main class.

package com.shengwang.demo;

import io.netty.bootstrap.ServerBootstrap;
import io.netty.channel.ChannelInitializer;
import io.netty.channel.ChannelOption;
import io.netty.channel.ChannelPipeline;
import io.netty.channel.nio.NioEventLoopGroup;
import io.netty.channel.socket.SocketChannel;
import io.netty.channel.socket.nio.NioServerSocketChannel;
import io.netty.handler.codec.string.StringDecoder;
import io.netty.handler.codec.string.StringEncoder;
import io.netty.util.concurrent.DefaultEventExecutorGroup;
import io.netty.util.concurrent.EventExecutorGroup;

import java.io.IOException;

public class NettyServer {

  public static void main(String[] args) throws IOException, InterruptedException {
    NioEventLoopGroup boosGroup = new NioEventLoopGroup();
    NioEventLoopGroup workerGroup = new NioEventLoopGroup();
    ServerBootstrap bootstrap = new ServerBootstrap();
    bootstrap.group(boosGroup, workerGroup);
    bootstrap.channel(NioServerSocketChannel.class);
    
    // ===========================================================
    // 1. define a separate thread pool to execute handlers with
    // slow business logic. e.g database operation
    // ===========================================================
    final EventExecutorGroup group = new DefaultEventExecutorGroup(1500); //thread pool of 500
    
    bootstrap.childHandler(new ChannelInitializer<SocketChannel>() {
      @Override
      protected void initChannel(SocketChannel ch) throws Exception {
        ChannelPipeline pipeline = ch.pipeline();
        pipeline.addLast(new StringEncoder()); 
        pipeline.addLast(new StringDecoder()); 
        
        //===========================================================
        // 2. run handler with slow business logic 
        //    in separate thread from I/O thread
        //===========================================================
        pipeline.addLast(group,"serverHandler",new ServerHandler()); 
      }
    });
    
    bootstrap.childOption(ChannelOption.SO_KEEPALIVE, true);
    bootstrap.bind(19000).sync();
  }
}

This echo server depends on netty 4.0.34.

    <dependency>
      <groupId>io.netty</groupId>
      <artifactId>netty-all</artifactId>
      <version>4.0.34.Final</version>
    </dependency>
Powered by Blogger.

About The Author

My Photo
Has been a senior software developer, project manager for 10+ years. Dedicate himself to Alcatel-Lucent and China Telecom for delivering software solutions.

Pages

Unordered List