Showing posts with label JPA. Show all posts

Wednesday, December 9, 2015

Most used Hibernate properties during development

Hibernate has many properties that can be very helpful during development phrase. In this article we list some most used hibernate properties  used when developing/testing persistence layer applications.

1. Meaning of most used hibernate properties

1.1 Print out Hibernate created SQL

hibernate.show_sql = true

1.2 Automatic create tables according to entities

hibernate.hbm2ddl.auto = create

Change to create-drop if you want to drop the created table when application over. Useful for prototype and testing.

1.3 Run SQL scripts at beginning of application

hibernate.hbm2ddl.import_files = /path/of/sqlfile

This's most used to insert some test data before unit test case running.

1.4 Use c3p0 connection pool

hibernate.c3p0.min_size=5                              // minimum connections in pool
hibernate.c3p0.max_size=20                           // maximum connections in pool
hibernate.c3p0.timeout=1800                        // time out to remove idle connection. In seconds
hibernate.c3p0.max_statements=50          // cache prepared statements
hibernate.c3p0.idle_test_period=3000      // how often to validate a connection. In seconds.

1.5 Use Improved Naming Strategy ("clientAddress"->"client_address")

hibernate.ejb.naming_strategy  = org.hibernate.cfg.ImprovedNamingStrategy

2. Use Hibernate properties in JPA persistence.xml

If use Hibernate as JPA provider, you can set hibernate properties in persistence.xml.

<?xml version="1.0" encoding="UTF-8"?>
<persistence version="2.1"
  xmlns="http://xmlns.jcp.org/xml/ns/persistence"
  xmlns:xsi="http://www.w3.org/2001/XMLSchema-instance"
  xsi:schemaLocation="http://xmlns.jcp.org/xml/ns/persistence 
                      http://xmlns.jcp.org/xml/ns/persistence/persistence_2_1.xsd">
  <persistence-unit name="persistenceUnitName"  transaction-type="RESOURCE_LOCAL">
    <provider>org.hibernate.ejb.HibernatePersistence</provider>
    <exclude-unlisted-classes>false</exclude-unlisted-classes>
    <properties>
      <!-- common jdbc configuration -->
      <property name="javax.persistence.jdbc.driver" value="org.h2.Driver" />
      <property name="javax.persistence.jdbc.url" value="jdbc:h2:mem:mydb" />
      <property name="javax.persistence.jdbc.user" value="sa" />
      <property name="javax.persistence.jdbc.password" value="" />
    
      <!-- ==================== -->
      <!-- hibernate properties -->
      <!-- ==================== -->
      <property name="hibernate.hbm2ddl.auto" value="create" />
      <property name="hibernate.show_sql" value="true"/>
      <property name="hibernate.ejb.naming_strategy" value="org.hibernate.cfg.ImprovedNamingStrategy"/>
    </properties>
  </persistence-unit>
</persistence>

3. Use Hibernate properties in Spring Boot


Spring boot does a lot of auto configurations.  So there is no need to use hibernate.hbm2ddl.import_files to set a sql script file location to run. Just put the sql script file as src/main/resources/import.sql. Spring boot will auto config it if spring-boot-starter-data-jpa is in pom.


There is also no need for hibernate.hbm2ddl.auto. Spring boot will also auto detect if the database used is a embedded one, like HSQL, H2 or Derby, or external database. If a embedded database is used,  default is create-drop. Otherwise for external database,  default is none. (No tables will be auto created). You can set this behavior in spring boot's  configuration file application.properties with spring.jpa.hibernate.ddl-auto= create, for example.


Other hibernate properties can be se with prefix 'spring.jpa.properties.' , such as add following lines in /src/main/resources/application.properties 


# hibernate special properties, with prefix "spring.jpa.properties."
spring.jpa.properties.hibernate.dialect=org.hibernate.dialect.H2Dialect
spring.jpa.properties.hibernate.c3p0.min_size=3
spring.jpa.properties.hibernate.c3p0.max_size=10
spring.jpa.properties.hibernate.show_sql=true

4. What's More


For complete hibernate 4.x configuration properties, check official hibernate reference.

Monday, November 30, 2015

Understand Persistence Context Collision in JEE

When deal with persistence layer in JEE application, persistence context is the magic that make your entity instances different from a normal POJO. Persistence context manages the entity instances to make it finally synchronized with database.

The persistence context collision happens when invoking stateful session bean from a stateless session method if both beans has their EntityManager defined. (BTW, Use stateful bean from stateless bean itself is not a good idea, but this article just focuses on persistence context)

In this article, for simplicity, when we mention stateless bean, we mean a stateless bean with EntityManager variable and its methods operate on the persistence. When  we mention stateful bean, we mean a stateful bean with EntityManager variable and its methods operate on persistence. In short we only talk about beans in persistence layer.

0. Basic rules about persistence context

Here are some basic rules about persistence context:

There will be only one active persistence context at any time for a transaction.

JEE container can propagate persistence context between different EntityManager variables in a single transaction. (Different EntityManager field variables of different beans can use the same persistence context).

Stateless bean usually use transaction-scoped persistence context, which means when the transaction is over, the persistence context is also gone. (When the bean's method is over, transaction is gone, persistence context is also gone)

Stateful bean usually use extended persistence context. The persistence is created when the bean instance is created and only destroy when the stateful bean is removed. The extended persistence context will be associated to a transaction when a method of stateful bean is called. When the method is over, transaction is gone, but the persistence context doesn't  go with the transaction but stay for the next transaction until the whole stateful bean is removed by the container.

Stateful bean always use his own extended  persistence context,  if the active persistence context is not the extended one, javax.ejb.EJBException will be thrown, this is called persistence context collision. This usually happens when call a stateful bean from a stateless bean.

Let see a simple example of persistence context collision.

1. Define pom.xml

<project xmlns="http://maven.apache.org/POM/4.0.0" xmlns:xsi="http://www.w3.org/2001/XMLSchema-instance"
xsi:schemaLocation="http://maven.apache.org/POM/4.0.0 http://maven.apache.org/maven-v4_0_0.xsd">
<modelVersion>4.0.0</modelVersion>
<groupId>com.shengwang.demo</groupId>
<artifactId>jee-persistence-context-collision</artifactId>
<packaging>war</packaging>
<version>1.0</version>
<name>jee-persistence-context-collision Maven Webapp</name>
<url>http://maven.apache.org</url>

<properties>
<project.build.sourceEncoding>UTF-8</project.build.sourceEncoding>
<!-- where glassfish 4.0 is installed -->
<glassfish.home>D:\glassfish4.0</glassfish.home>
</properties>

<dependencies>
<dependency>
<groupId>javax</groupId>
<artifactId>javaee-api</artifactId>
<version>7.0</version>
</dependency>
</dependencies>
<build>
<finalName>jee-persistence-context-collision</finalName>
<plugins>
<!-- Use Java 1.7 -->
<plugin>
<groupId>org.apache.maven.plugins</groupId>
<artifactId>maven-compiler-plugin</artifactId>
<version>2.5.1</version>
<configuration>
<source>1.7</source>
<target>1.7</target>
</configuration>
</plugin>

<!-- use mvn cargo:run to deploy and start server-->
<plugin>
<groupId>org.codehaus.cargo</groupId>
<artifactId>cargo-maven2-plugin</artifactId>
<inherited>true</inherited>
<configuration>
<container>
<containerId>glassfish4x</containerId>
<type>installed</type>
<home>${glassfish.home}</home>
</container>
<configuration>
<type>existing</type>
<home>${glassfish.home}/glassfish/domains</home>
</configuration>
</configuration>
</plugin>
</plugins>
</build>
</project>

The pom has 1 dependency for JEE 7 and 2 plugins. The first plugin specify the Java version (Java 1.7), the second one is for deploying package to local glassfish 4.0 with maven command-line. Demo use glassfish 4.0 as JEE container.


2. Define entity class


A very simple entity class Client.java with 2 fields, int clientId and String name.

package com.shengwang.demo.entity;

import javax.persistence.Column;
import javax.persistence.Entity;
import javax.persistence.GeneratedValue;
import javax.persistence.GenerationType;
import javax.persistence.Id;

@Entity
public class Client {
@Id
@GeneratedValue(strategy = GenerationType.IDENTITY)
@Column(name = "CLIENT_ID")
private int clientId;

private String name;

/* getter setter omitted */

@Override
public String toString() {
return "{" + clientId + "," + name + "}";
}
}

The entity is trivial.


3. Define stateful bean

package com.shengwang.demo.session;

import javax.ejb.Stateful;
import javax.persistence.EntityManager;
import javax.persistence.PersistenceContext;
import javax.persistence.PersistenceContextType;

import com.shengwang.demo.entity.Client;

@Stateful
public class MyStatefulBean {
@PersistenceContext (type=PersistenceContextType.EXTENDED) // extended
EntityManager em;
Client client;

public String changeClientName() {
if (client == null) {
client = em.find(Client.class, 1);
}
client.setName(client.getName() + "_" + "hello");

return client.toString();
}
}

This stateful bean just for demo, so doesn't make much sense. Its only method change the first client's name, add suffix to the name.


4. Define stateless bean

package com.shengwang.demo.session;

import javax.ejb.EJB;
import javax.ejb.Stateless;
import javax.persistence.EntityManager;
import javax.persistence.PersistenceContext;

import com.shengwang.demo.entity.Client;

@Stateless
public class MyStatelessBean {
@PersistenceContext
EntityManager em;

@EJB
MyStatefulBean statefulBean;

public String methodA() {
String c1 = em.find(Client.class, 1).toString(); // any operation of em
String c2 = statefulBean.changeClientName();

return c1 + "," + c2;
}
}

The stateless bean has one method, methodA. Call the em.find() first then call the stateful beans's method. Calling methodA() will cause persistence context collision!


Why? Because the transaction-scoped persistence is created lazy,  so it(PC-A) will be created only when em.find()  called, and this persistence context is now the active persistence context. But the stateful bean with extended persistence context init persistence context eagerly, which means the stateful bean already has a persistence context(PC-B) when it initialized. Now the active persistence context propagated to stateful bean,PC-A,   is not the extended persistence context PC-B. So collision happens and exception will be thrown. We can see this when we try to run it below.


5. Define a servlet as EJB client


To use the beans we defined above, let's define a simple servlet.

package com.shengwang.demo.servlet;

import java.io.IOException;
import java.io.PrintWriter;

import javax.ejb.EJB;
import javax.servlet.ServletException;
import javax.servlet.annotation.WebServlet;
import javax.servlet.http.HttpServlet;
import javax.servlet.http.HttpServletRequest;
import javax.servlet.http.HttpServletResponse;

import com.shengwang.demo.session.MyStatefulBean;
import com.shengwang.demo.session.MyStatelessBean;


@WebServlet(name = "testServlet", urlPatterns = { "/test" })
public class TestServlet extends HttpServlet {
private static final long serialVersionUID = 1L;

@EJB
MyStatelessBean statelessBean;

@EJB
MyStatefulBean statefulBean;

@Override
protected void doGet(HttpServletRequest req, HttpServletResponse resp) throws ServletException, IOException {
String str = statelessBean.methodA();

PrintWriter out = resp.getWriter();
out.printf("%s", str);
out.flush();
}
}

In the servlet, the stateless bean's only method is invoked.


6. Config persistence.xml


Usually the META-INFO/persistence.xml is simple for JEE applications, tell the server which data source application wants to use.

<?xml version="1.0" encoding="UTF-8"?>
<persistence version="2.1" xmlns="http://xmlns.jcp.org/xml/ns/persistence"
xmlns:xsi="http://www.w3.org/2001/XMLSchema-instance"
xsi:schemaLocation="http://xmlns.jcp.org/xml/ns/persistence
http://xmlns.jcp.org/xml/ns/persistence/persistence_2_1.xsd">
<persistence-unit name="demo-persistence-unit" transaction-type="JTA">
<jta-data-source>jdbc/MySQLDataSource</jta-data-source>
</persistence-unit>
</persistence>

There's a data source on server with JNDI name  jdbc/MySqlDataSource.


image


Finally, before running the demo, the project hierarchy looks like below.
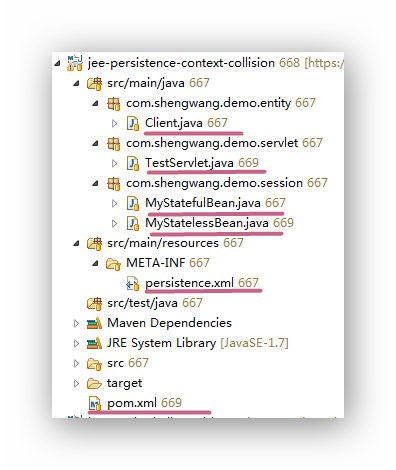
image 

7. Run the demo


Run the demo with mvn command-line:

mvn clean verify cargo:run

This command will start glassfish server and deploy our application to it. Then access the servlet by browser. You can see the exception: javax.ejb.EJBException: There is an active transactional persistence context for the same EntityManagerFactory as the current stateful session bean's extended persistence context
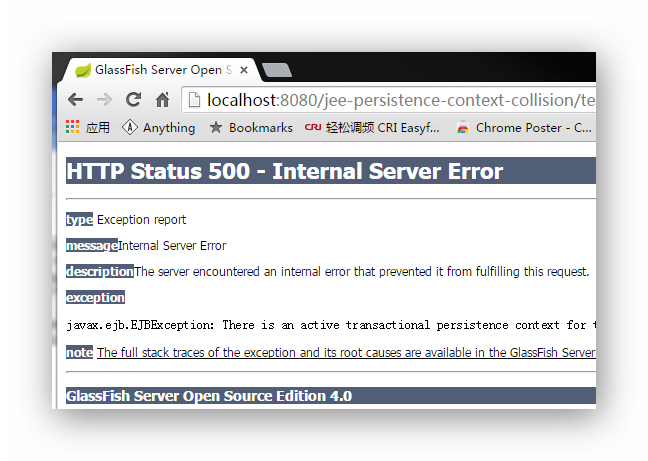

image


8. What's more


What will happen if we make a little change to the stateless bean.

@Stateless
public class MyStatelessBean {
@PersistenceContext
EntityManager em;

@EJB
MyStatefulBean statefulBean;

public String methodA() {

// These 2 lines switch order
String c2 = statefulBean.changeClientName();
String c1 = em.find(Client.class, 1).toString();

return c1 + "," + c2;
}
}

The order of two lines are swithed. Now the demo can run without any exception.

Why? Because when invoke the stateful bean there is no persistence context yet, so the stateful bean's method can use its own extended persistence context to run. Then the em.find() is invoked, a transaction-scoped persistence create when first em operation invoked. So these 2 lines use different persistence context! If this is understood, then then output also makes sense to you.
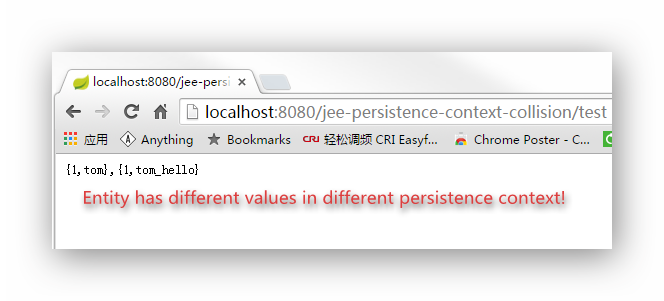
image


Furthermore, If you really need to call stateful bean from stateless bean in it original order, which cause the persistence context collision. Here are some detours ( think twice when you want to do this):


1. Mark stateful bean (or its method invoked by stateless bean) REQUIRE_NEW for TransactionAttributeType. So there will be 2 transactions for stateless and stateful bean respectively. Each transaction can has its own persistence context. Similar scenario like above, entities may have different values on different context.


2. Mark stateful bean (or its method invoked by stateless bean) NOT_SUPPORT for TransactionAttributeType. If only invoke stateful bean's read-only operation from stateless bean.  (Servers like Glassfish may need to config JDBC connection pool to enable Non Transactional Connections)


3. Use Application-Managed EntityManager instead of the default Container-Managed Entity Manager in the stateful bean.

Sunday, December 21, 2014

The Value of Annotation @Temporal for Date Related Columns

The annotation @Temporal in official javadoc is described like below:
This annotation must be specified for persistent fields or properties of type java.util.Date and java.util.Calendar.

So when the field variable is a java.util.Date or java.util.Calendar, it MUST be annotated by @Temporal.

There are 3 values for @Temporal

  • TemporalType.DATE
  • TemporalType.TIME
  • TemporalType.TIMESTAMP

Here is a demo to show the usage of there 3 values. The Entity 'MyEntity' has a field called 'lastUpdateTime' which is a defined as a java.util.Date variable. let's update it in java like this:

  import java.util.Date;
//...
// MyEntity is the JPA entity, em is EntityManager context
MyEntity e = em.find(MyEntity.class, 1L); //get the row with id=1
e.setLastUpdateTime(new Date());

TemporalType.DATE


If the column annotated with @Temporal(TemporalType.DATE) like this:

  @Temporal(TemporalType.DATE)
@Column(name="LAST_UPDATE_TIME")
private Date lastUpdateTime;

The record in database after update will look like:Snap_2014.12.22 12.49.51_001


TemporalType.TIME


If the column annotatedwith @Temporal(TemporalType.TIME) like this:

  @Temporal(TemporalType.TIME)
@Column(name="LAST_UPDATE_TIME")
private Date lastUpdateTime;

The record in database after update will look like:Snap_2014.12.22 13.06.58_002


TemporalType.TIMESTAMP


If the column annotated with @Temporal(TemporalType.TIMESTAMP) like this:

  @Temporal(TemporalType.TIMESTAMP)
@Column(name="LAST_UPDATE_TIME")
private Date lastUpdateTime;

The record in database after update will look like:Snap_2014.12.22 13.10.14_003

Thursday, December 18, 2014

How to configure primary key's generator in JPA entity for oracle

In JPA there are 4 strategies to automatically generate value for a primary key column:

  • Auto
  • Identity
  • Sequence
  • Table

To some extent, there are only 3 strategies, the last 3 ones. Because the first 'Auto' just let the JPA implementation to choose which one of the rest 3 strategies it will use. For example working with Oracle + EclipseLink 2.5.0,  the "Auto" will result in the strategy "Table" being choosen . This behavior depends on the database and the JPA implementation in your project.

0. Before we start

In this tutorial, Oracle is database and EclipseLink is JPA implementation.  The table name in this demo is T_JUST_FOR_TEST, which only have 1 field 'id' as its primary key for simplicity's sake.

In JPA the annotation for value generation of  primary key is @GeneratedValue

Note : The value generation strategy only  take effect when you try to write back to database from your java application. In other words, if the table is read-only in the Java application,  Any specified strategy is meaningless in Entity class.

1. Use Strategy Identity

Oracle don't support Identity.

2. Use Strategy Sequence

2. 1 Define Sequence in Database

Make sure there is sequence that you can use or you can define a new one like this.

-- Create sequence 
create sequence SEQ_JUST_FOR_TEST
minvalue 1
maxvalue 9999999999999999999999999999
start with 1
increment by 1;

The created sequence is named 'SEQ_JUST_FOR_TEST'. it starts from 1 and increase 1 for every next value.


2.2 Define Entity class


Use Annotations for primary key column. First define a sequence generator, then use the generator.

package com.shengwang.example;

import java.io.Serializable;
import javax.persistence.*;

@Entity
@Table(name="T_JUST_FOR_TEST")
public class TJustForTest implements Serializable {
private static final long serialVersionUID = 1L;

@Id
@SequenceGenerator(name="SEQ_GEN", sequenceName="SEQ_JUST_FOR_TEST", allocationSize=1)
@GeneratedValue(strategy=GenerationType.SEQUENCE, generator="SEQ_GEN")
private long id;

public TJustForTest() {}

public long getId() {
return this.id;
}

public void setId(long id) {
this.id = id;
}
}

In the above Entity definition class, The annotation @SequenceGenerator is used to define a Sequence Generator named "SEQ_GEN", which is then used in the @GeneratedValue annotation.  The attribute sequenceName is the real sequence  name in Oracle. The allocationSize is the increment for every step.  Make sure the value of allocationSize matches the corresponding value in the sequence definition in Oracle.  In the annotation @GeneratedValue, strategy "GenerationType.SEQUENCE" is specified, and generator set to the sequence generator "SEQ_GEN" defined one line above.


Every time when insert a new TJustForTest entity record into the table like below, the primary key id will increase one.

  // em is the injected EntityManager;
TJustForTest t = new TJustForTest();
em.persist(t);

3. Use Strategy Table


3.1 Define table in database


A table need to be defined in database.

create table T_GENERATOR1
(
gen_key VARCHAR2(255) not null,
gen_value NUMBER,
constraint pk_gen_key PRIMARY KEY (gen_key)
)

The table works somehow like a key-value pair or hash table. Every row of the table can  logically be treated as a sequence.  Normally, the data type of key column is string and data type of value column is number. To make it more readable, A string combines schema(MONITOR2012) and table name(T_JUST_FOR_TEST) is used as key in this tutorial.


3.2 Insert one row into the table

insert into T_GENERATOR (Gen_Key,GEN_VALUE) values ('MONITOR2012.T_JUST_FOR_TEST',0)

This one row data has to be insert in to the table T_GENERATOR before we can use it as generator in JPA entity class.


3.3 Define Entity Class


Use Annotations for primary key column. First define a table generator, then use the generator.

package com.shengwang.example;

import java.io.Serializable;
import javax.persistence.*;

@Entity
@Table(name = "T_JUST_FOR_TEST")
public class TJustForTest implements Serializable {
private static final long serialVersionUID = 1L;

@Id
@TableGenerator(name="TABLE_GEN",table="T_GENERATOR", pkColumnName = "GEN_KEY", pkColumnValue = "MONITOR2012.T_JUST_FOR_TEST", valueColumnName = "GEN_VALUE", initialValue = 1, allocationSize = 1 )
@GeneratedValue(strategy = GenerationType.TABLE, generator="TABLE_GEN")
private long id;

public TJustForTest() {
}

public long getId() {
return this.id;
}

public void setId(long id) {
this.id = id;
}
}

The annotation @TableGenerator is used to define a table generator named "TABLE_GEN". This table generator is used as the generator for @GeneratedValue.


Let's go through all the rest attributes in annotation @TableGenerator in details.


table is the table name in database used. pkColumnName is the column name of the table.. pkColumnValue is the value of the key. These 2 attributes are logically combined as a where phase in SQL, " Select ... from T_GENERATOR where GEN_KEY='MONITOR2012.T_JUST_FOR_TEST'", to locate the single record in the database table. valueColumnName is the column name to store real id value. initialValue is the first value of the generator. allocationSize is the step to increase. 


This is how these attributes work in logic: Every time JPA implementation need to generate value, it will first find the table table, then find the row using pkColumnName and pkColumnValue, then read the value of valueColumnName, add allocationSize, use it and update the value back to valueColumnName.


Every time when insert a new TJustForTest entity record into the table like below, the primary key id will increase one.

  // em is the injected EntityManager;
TJustForTest t = new TJustForTest();
em.persist(t);

4. Summary

Strategy sequence and strategy table can be used in JPA entity class if working with Oracle. The strategy sequence is oracle dependent, it does not work if you change to other database like MySQL. The Strategy table is database independent, but seems a little bit more complex than sequence strategy.

Tuesday, December 9, 2014

How to create Java classes from existing tables in database for JPA

If JPA is your persistence layer in your project and you have tables already defined in database. You can use JPA tools in Eclipse to automatically create corresponding Java Entity classes from those tables in database.

In this article, Java JPA entities will be created from an oracle database on LAN.

1. what you need

  • Eclipse 4.3 +  ( In this article, Eclipse Java EE version 4.3.2 kepler is used )
  • Database connection configuration in Eclipse. In eclipse, configure a database connection to the oracle database.  If you don't know how to do that, read this article first How to add oracle DB connection in Eclipse.

2. Make sure you have JPA support enabled in your projects

Righ click on the project name and select "Properties"

Snap_2014.12.09 14.30.34_003

Use project facets if project facets not enabled

Snap_2014.12.09 10.02.48_001

Click the "JPA" if it's not selected, then click "OK" to close the project properties window.

Snap_2014.12.09 14.34.20_004

3. create Java classes from tables

After enabling JPA in project properties, now right click you eclipse project name again, you should see a new context menu item "JPA tools" appears. Choose "Generate Entities from tables"

If you see the "JPA tools" menu but the sub menu don't have "Generate Entities from tables"  item, make sure you right click on the project name instead of a package or a class file.

Snap_2014.12.09 14.49.33_006 

Select a database connection to let Eclipse get the tables  used to generated class from.  (See another tutorial on  how to configure a database connection in Eclipse)

Snap_2014.12.09 15.04.08_007

After connected to the database, schema and tables will be listed below, choose the tables you need in your Java project and click "Next"Snap_2014.12.09 15.07.21_008

In this tutorial  2 tables are selected. There is a  foreign key between 2 tables. Logically one  platform can have more than one devices. It's a "1 to many" mapping.

Next Eclipse automatically create associations between tables you select.  Click each association to see the details.

Snap_2014.12.09 15.20.46_009

In the final step, Eclipse offers the chance to change generated Java class name and the field name inside the generated java class.

Snap_2014.12.09 15.28.13_011

Snap_2014.12.09 15.29.02_012

Click "finish" and the Java classes will be created.  For example one of the Entity class created looks like:

Snap_2014.12.09 15.38.05_013

The created Java Entity class is well annotated and ready for use!

Powered by Blogger.

About The Author

My Photo
Has been a senior software developer, project manager for 10+ years. Dedicate himself to Alcatel-Lucent and China Telecom for delivering software solutions.

Pages

Unordered List