Showing posts with label Java SE. Show all posts

Tuesday, February 16, 2016

How to use H2 embeded database in spring application

H2, as a embeded memory database, is mainly used for development and test phase. H2 also has a web console which is very convenient.

image

1. Use H2 in Spring boot application

Spring boot has almost everything done for you. You need to do 2 steps, first inluce H2 in you pom.xml.

  <!-- H2 -->
  <dependency>
   <groupId>com.h2database</groupId>
   <artifactId>h2</artifactId>
   <scope>runtime</scope>
  </dependency>

The version of H2 is managed by spring boot and  scope can be set to runtime because you code should not have any APIs come from H2 itself. Then specify datasource url to use H2 in the application.properties file or in lieu of yaml styled configuration

# define DataSrouce properties 
# use h2 can have a buid in web console http://localhost:8080/h2-console
spring.datasource.url=jdbc:h2:mem:mydb

In spring boot application, there is no need to set username and password for using H2 memory database, because H2's default username is 'sa' (or SA, case insensitive), default password is empty. These default username/password will be auto configured by spring boot.  Also Spring boot will config the H2 web console for you automatcally at http://localhost:8080/h2-console

Use H2 in spring-mvc application (non-spring boot)

In non-spring boot application, which is normall just powered by spring-webmvc and other spring artifacts, using H2 need 3 steps. First is also to include H2 in pom.xml

  <!-- H2 -->
  <dependency>
   <groupId>com.h2database</groupId>
   <artifactId>h2</artifactId>
   <version>1.4.190</version>
  </dependency>

Secondly,  use H2 in any ORM configuration. For example if your project uses JPA as persistence and uses Hibernate as JPA service provider. The JPA's configuration file /META-INF/persistence.xml may looks like below.

<?xml version="1.0" encoding="UTF-8"?>
<persistence version="2.1"
 xmlns="http://xmlns.jcp.org/xml/ns/persistence" xmlns:xsi="http://www.w3.org/2001/XMLSchema-instance"
 xsi:schemaLocation="http://xmlns.jcp.org/xml/ns/persistence http://xmlns.jcp.org/xml/ns/persistence/persistence_2_1.xsd">
 <persistence-unit name="spring-persistence-jpa-tx" transaction-type="RESOURCE_LOCAL">
  <provider>org.hibernate.ejb.HibernatePersistence</provider>
  <exclude-unlisted-classes>false</exclude-unlisted-classes>
  <properties>
   <property name="javax.persistence.jdbc.driver" value="org.h2.Driver" />
   <property name="javax.persistence.jdbc.url" value="jdbc:h2:mem:mydb" />
   <property name="javax.persistence.jdbc.user" value="sa" />
   <property name="javax.persistence.jdbc.password" value="" />
   
   <!-- Automatically drop then create table -->
   <property name="hibernate.hbm2ddl.auto" value="create" />
   <!-- print out sql  -->
   <property name="hibernate.show_sql" value="true"/>
  </properties>
 </persistence-unit>
</persistence>

Specify the jdbc driver, jdbc url and etc , just like other database.

Finally, and optionally, If you want the H2 web console, you need to add a bean into spring context. In xml-styled spring configuration file, it looks like below.

 <bean id="h2WebServer" class="org.h2.tools.Server" factory-method="createWebServer"
  init-method="start" destroy-method="stop">
  <constructor-arg value="-web,-webAllowOthers,-webDaemon,-webPort,8082" />
 </bean>
In java-styled spring configuration, it looks like below.
@Configuration
@ComponentScan
public class JavaConfiguration {
 //... other beans
 
 @Bean(initMethod="start",destroyMethod="stop")
 public org.h2.tools.Server h2WebConsonleServer () throws SQLException {
   return org.h2.tools.Server.createWebServer("-web","-webAllowOthers","-webDaemon","-webPort", "8082");
 }
}

The -webDaemon means run H2 web console in a daemon thread which will not block the application process termination. -webPort can set the web console service port, default is 8082. The web console url is http://localhost:8082 (Different from the web console url in spring boot application)

Use H2 in spring boot application

In a spring boot application, first add H2 to the dependency.

  <dependency>
    <groupId>com.h2database</groupId>
    <artifactId>h2</artifactId>
    <version>1.4.182</version>
    <scope>runtime</scope>
  </dependency>

Choose a proper H2 version to use and also set scope to runtime become you should not expliity use any class from H2 in you application.

Then configure application.properties or application.yml file for spring boot datasource. Following is example in application.yml file.

spring:
  datasource:
    url: jdbc:h2:mem:testdb;DB_CLOSE_DELAY=-1;DB_CLOSE_ON_EXIT=FALSE
    username: sa
    password:
    driver-class-name: org.h2.Driver
    platform: h2

  # enable H2 web console and set url for web console
  # http://localhost:8080/console
  h2:
    console:
      enabled: true
      path: /console
The default username for H2 is 'sa', default password is empty.

If you also use spring security in your application, which means spring security is in your pom.xml like below.

<dependency>
  <groupId>org.springframework.boot</groupId>
  <artifactId>spring-boot-starter-security</artifactId>
</dependency>

Then you need to add a line in your spring security configuration to make H2 web console working.

@EnableWebSecurity
 
public class SecurityConfig extends WebSecurityConfigurerAdapter {
  Logger logger = LoggerFactory.getLogger(SecurityConfig.class);
 
 //......
 
 
  @Override
  protected void configure(HttpSecurity http) throws Exception {
    http.authorizeRequests().antMatchers("/").permitAll(); 
    http.authorizeRequests().antMatchers("/imgs/**").permitAll(); 
    http.authorizeRequests().antMatchers("/admin/**").hasRole("ADMIN");
    http.authorizeRequests().antMatchers("/**").hasRole("USER").and().formLogin();
  
    // add this line to use H2 web console
    http.headers().frameOptions().disable();
  }
}

Without this line to setup frame in spring security, you will see a empty page after you login the H2  web console.

Monday, February 15, 2016

Generate a random String of specified length in Java

Sure you can write a short piece of code of your own to do this, but apache's common library makes it just a one line task.  Furthurmore, the library is so widely used, it's maybe already in your class path involved by other third party library even you haven't noticed that. 

In case you don't have it in your class path, add this to you maven pom.xml

<dependency>
  <groupId>org.apache.commons</groupId>
  <artifactId>commons-lang3</artifactId>
  <version>3.0</version>
</dependency>

Here are the ways to create the most used random String, include random ASCII, random letters, random digits and random letter+digits. Use RandomStringUtils's static methods to get what you need.

  int count = 6; // length of the generated String
  
  // from all ASCII code [32-126] 
  System.out.println(RandomStringUtils.randomAscii(count));  // ex. L\=u8_
  
  // from [A-Z,a-z]
  System.out.println(RandomStringUtils.randomAlphabetic(count)); // ex. TxTbYm
  
  // from [0-9]
  System.out.println(RandomStringUtils.randomNumeric(count));  // ex. 953626
  
  // from [A-Z,a-z,0-9]
  System.out.println(RandomStringUtils.randomAlphanumeric(count));//ex. Wuycb5

Sunday, January 24, 2016

Break down package java.util.stream

Stream processing is significant feature of Java 8. In api level, it falls into package java.util.stream. By breaking down the package, you can get a whole view of how the stream api works.

Steam introduces map-reduce similar functions to Java. The article is based on Java 8.

1. Hierarchy

java_util_stream

The above only has most important components for understanding package java.util.stream.  4 builder interfaces corresponding to different stream type and 1 class for low-level library writers are not included.

There are only 1 class on above diagram, class Collectors, The rests are all interfaces. The most important are the 4 stream interfaces in pink. They can again be divided into 2 groups, streams for numbers and stream for other non-number object.  You can roughly think streams for number, IntStream/LongStream/DoubleStream, are special cases for Stream<T>, by set Generic Type T to Integer/Long/Double and add special methods for number manipulation like average(), sum().

All 4 streams has collect(supplier, accumulator, combiner) method. (supplier,accumlator,combiner will be described below). Method collect() provides the most general way to finally do the reduce. For number streams, in most cases, we don't need to use collect() at all, JDK provides shortcut methods, like average(),sum(),max(),min(), are good enough.

To simplify the usage of collect(supplier, accumulator, combiner) method, JDK extracts supplier, accumulator, combiner, together with finisher to the  interface Collector<T,A,R>. So reasonably there's an overload method collect(Collector<? super T,A,R> collector).

Furthemore, to make  collect(Collector<? super T,A,R> collector) easy to use, JDK provides the helper class Collectors with a bunch of static methods to create instance of Collector as input argument.

From the above diagram, we can see there's also reduce() methods for all stream, you can think them like simplified version of collect().

2. Stream methods

2.1 BaseStream functions

unordered(), make or just mark a stream is unordered. Usually it's used for parallel processing the stream. For example you have a stream from a list, which is ordered, but you only want to calculate the sum which has nothing to do with the order information, you can unordered the stream to make it can be processed in parallel.

sequential()/parallel(), change the stream to sequential or parallel.  Default stream is sequential for most cases, like the stream() return from a java collection.

2.2 Most used stream functions

For all example codes, suppose we have a variable users as list of User and  a stream userStream created from the list.

public class User {
  public static enum Gender {
    MALE, FEMALE
  }
 
  private Gender gender;
  private int age;
  private String username;
  
  // ignore getter,setter
}

List <User>  users;
// ignore initilization of users
Stream<User> userStream = users.stream();

filter(), screen out some element in the stream. For example

userStream.filtere(User u –> u.getAge() >= 18) //return stream with only adult users

will return a new stream with only adult users.

map(), can let you apply a given function on every element of the stream and create a new stream from that. For example

userStream().map(u->u.getAge());       //return Stream<Integer>
userStream().mapToInt(u->u.getAge());  //return IntStream

mapToInt() return a new IntStream which is convinient to process int elements.  There are also methods start with flatMap such as flatMap(),flatMapToInit(). The difference between map and flatMap is: map return only one output element for every one input element(Let's call it One-To-One), flatMap return multiple output for every single input(Let's call it One-To-Many).  for example:  

List&lg;string> lines = Arrays.asList("1 2 3 4", "5 6 7","8 9");
// every input string return multiple numbers
lines.stream().flatMap(line -> Arrays.asList(line.split("\\s+")).stream());

reduce(), will make a stream of type T finally return a single result of type T(let's call it Many-To-One). For example calcalate the sum of all users' age:

Optional<Integer> sum = userStream.map(u->u.getAge()).reduce((x,y)->x+y);
System.out.println("sum = "+sum.get());

When do reduce() on a Stream<Integer> return from map(), logically it will finally return a single Integer. In API level, a java.util.Optional<Integer> is used to contain that Integer.

Number streams has more methods special for number calculations, such as sum() or average(), so the previous example to calculate age sum can also be written like below:

int sum = stream.mapToInt(u->u.getAge()).sum();
System.out.println("sum = "+sum);

Also if we use the most generic method for reduction collect(), the previous age sum calculation can also be written like this:

int sum = userStream.collect(Collectors.summingInt(u -> u.getAge()));
System.out.println("sum = " + sum);

3. Collectors methods

The main purpose of class Collectors is to create Collector instance as input argument of stream's collect() method just like previous example. 

As name indicates, summing**() methods return Collector instance for producing the sum, averaging**() methods return Collector instance for producing arithmetic average. Here "**" can be Int, Long, and Double.

Methods like to**(), will return Collector that will return element in stream to a Java collection. Here "**" can be List, Set, Map,ConcurrentMap. The following example remove duplications from a list.

List<Integer> ages = Arrays.asList(25, 25, 30, 30, 35);  // list with duplication
List<Integer> distinctAges = ages.stream().distinct().collect(Collectors.toList()); // list without dup
System.out.println("distinctAges = " + Arrays.toString(distinctAges.toArray())); // [25,30,35]

Methods start like groupingBy() are very helpful.  They provide functions similar to "group by" in SQL.  There are several overload of groupingBy(), but mandatory parameter is the key to group, which will also be the key of the return Map.  For example, get a map of user grouped by gender, the key in the return Map is gender, the value is a user list of that gender.

// group users by gender
Map<Gender,List<User>> usersByGender = usreStream.collect(Collectors.groupingBy(u->u.getGender()));

If you want to calculate average user age for male and female respectively, see below.

Map<Gender, Double> averageAgeByGender = stream.collect(Collectors.groupingBy(User::getGender,
    Collectors.averagingDouble(User::getAge))); 
// print out  
averageAgeByGender.forEach((k,v)->System.out.printf("Average age of Gender %s is %f\n",k,v));

Methods partitioningBy(), can only group into 2 groups,  and key fixed to TRUE/FALSE,  so it can be thought as a simplified version of groupingBy(). 

4. Understand Collector

JDK provides class Collectors to make create Collector instance easily, so usually you don't play with Collector interface directly. But to better understand the stream process, you need at least know what a collector really does. 

Interface Collector<T,A,R> has 3 generic types:

  • T - the type of input elements to the reduction operation
  • A - the intermedia type of partial reduce result, most of time it's same as T, but as a application developer normally we don't care, so most of time "?" is used.
  • R - the result type of the reduction operation

The type T and R are more important for developers.

A collector has 4 main methods, they will be called internally in the collect() process. These 4 methods are:

  • creation of a new result container (A container = supplier().get())
  • incorporating a new data element into a result container (accumulator().accept(container, everyElement))
  • combining two result containers into one (combiner().apply(partialContainer1, partialContainer2))
  • performing an optional final transform on the container (finisher().apply(container))

The collector interface also provide a static method of(Supplier<A> supplier, BiConsumer<A,T> accumulator, BinaryOperator<A> combiner, Function<A,R> finisher, Collector.Characteristics... characteristics) to let you fully controll how to create a instance of your own collector.  Here's a example of creating Collector instance equivalent to Collectors.summingInt(), pay attention to how the supplier,accumulator,combiner and finisher are implemented.

// Can also defined as Collector<User,int[],Integer>
  Collector<User,?,Integer> myCollector; 
  
//myCollector = Collectors.summingInt(u->u.getAge());
  myCollector = Collector.of(
        () -> new int[1],                           //supplier
        (a, t) -> a[0] += t.getAge(),               //accumulator
        (a1, a2) -> {a1[0] += a2[0];return a1;},    //combiner
        a -> a[0]);                                 //finisher
    
  int sum = userStream.collect(myCollector);
  System.out.println("sum = " + sum);

5. Recap

To understand Java stream processing, we need to understand 4 stream interfaces(Stream<T>,IntStream,LongStream and DoubleStream), 1 Collecor interface and 1 Collectors class. Stream provide operations on every element in the stream, then reduce the element to final result. Besides many out-of-box functions for reduction, you can also use Collector and Collectors for more generic reduction operation.

Monday, January 18, 2016

Method Reference in Java 8

In java 8 method reference is introduced as a helper for the outstanding feature, Lambda Expression.  In some cases a lambda expression does nothing but to call an exsting method.  Method reference let you make this kind of lambda expression cleaner and shorter.

Let see an example, suppose we have a stream created from a User list. The class User has a int field call age with getter and setter.

List<User> users = Arrays.
//... add user in to list
Stream<User> stream = users.stream();

First without using method reference to calculate the averge age of all users.

Double averageAgeDouble = stream.collect(Collectors.averagingDouble((User u)->u.getAge()));

Using method reference, it looks like below

Double averageAgeDouble = stream.collect(Collectors.averagingDouble(User::getAge));

The method reference is shorter than normal lambda expression. The syntax is className::methodName,  which in our case is User::getAge, means arbitrary object of class User and the method name is getAge().

Wednesday, December 23, 2015

Break down package java.util.concurrent.locks

Since JDK 5, Java introduced the most powerful enhancement for concurrence, the package java.util.concurrent.This package contain 2 subpackages, one of them is java.util.concurrent.locks, which provides the notion of locks for synchorization. (BTW, the other subpackage is java.util.concurrent.atomic, which is a small toolkit of classes that support lock-free thread-safe programming on single variables, making common operation like i++ atomic in concurrent environment)

This article will give a big picture of the package java.util.concurrent.locks. Help you get a better understanding of this package.

This article suppose you have already know basic usage of the locks, so will not try to go into usage details, but to focus on the realations of all interfaces and classes as a whole.

1. Hirerarchy diagram

java_locks

There are only 3 interfaces in this package(green boxes). The diagram also has 4 concreate classes. Only the 2 classes in pink are usually created by keyword new directly, the rest two can not create by a direct new, because their constructor are not public but protected.

2. More explanation

The Condition instance is used to replace the low-level synchronization monitor. (If you want to know more about Java build-in low level synchronization mechanism, see here)

There is no public implementation of this interface in JDK. The only way to create Condition instance is  by newCondition() method of a Lock objects.

The methods await() and signal() are designed to replace the built-in wait() and notify() of every java Object.

The interfaces Lock and ReadWriteLock has no parent-child relation! Although Lock may sound like the parent of ReadWriteLock, but in fact they have no relations at all.

Since all locks implementation are reentrant, which means a thread already has lock can successfully call lock() again without blocking. So there are ways to get how lock hold count in program to know how many times to call unlock(). See the methods getHoldCount() and getReadHoldCount()/getWriteHoldCount().

ReentrantReadWriteLock.ReadLock  and ReentrantReadWriteLock.WriteLock (2 white boxes in diagram),can not be initialized by keyword new since they don’t have public constructors. So the instaces of these two classes can not live independently, but always accompanied by a ReentrantReadWriteLock instance.

Hope now you have a more clear view of package java.util.concurrent.locks.

Tuesday, December 1, 2015

Remote Debug in Eclipse

Remote debug a Java application means the application run on a different VM rather than the one used for Eclipse. The Java application can run on the same host of you Eclipse as a separate process or on remote host.

In practical remote debug happens when there are some external environments in production that you don't have in your development environment. Or you code works in development environment, but has problems in production environment.

Remote debug can let you connect to the running applications and do what you can do for debug, like breakpoint/single-step-run/watch variables, just like debug a local application.

To make remote debug possible, extra JVM options have to be set when running the application remotely.

In this article, we create a hello world Java application, run it with command line, then use Eclipse to connect to it. In fact this hello world application can run on any remote host, but for demo it will run on the same host as where Eclipse is.

1. Create Project in Eclipse

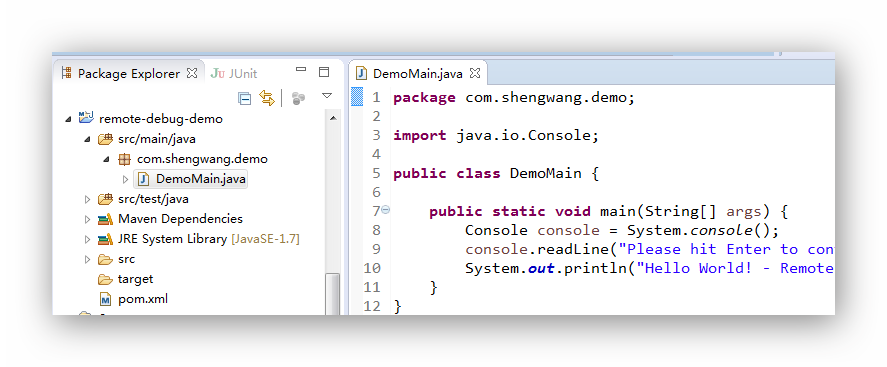
Create a Java project in Eclipse with a main class.

package com.shengwang.demo;

import java.io.Console;

public class DemoMain {

public static void main(String[] args) {
Console console = System.console();
console.readLine("Please hit Enter to continue...");
System.out.println("Hello World! - Remote Debug in Eclipse");
}
}

The demo project only has only 1 DemoMain.java.


image


Compile the project and it's ready to run. In your case this step means you finish your project's coding in Eclipse.


2. Run with extra JVM options


To enable remote debug, application has to be run with extra JVM options.


-Xdebug -Xrunjdwp:server=y,transport=dt_socket,suspend=n,address=0.0.0.0:8000


JDWP is the agent for debug and it will listen on port 8000, which is the default debug port in most case.


image


3.  Run Debug in Eclipse


Now the application is running, let's remotely debug it.


First select you project in Eclipse's package explorer. (make it easy to create debug configuration)


image


Then  click "Run-> Debug Configurations" from menu. Double-click "Remote Java Application" to create a debug configuration for the selected project.


image


Make sure the host and port is where you application runs and debug server specified port.  Then hit "Debug" to connect to the remote debug application. Almost done, you can debug the remote like you usually do. Let's set a break point on our source code.


image


Go back to our running application and hit enter to let it continue, the break point get hit and eclipse automatically switch Debug Perspective like local debugging.


image

Sunday, November 15, 2015

Low-level synchronization in Java

Low level synchronization is the mechanism used before package java.util.concurrent was introduced into Java 1.5. You may not use it since the modern Java provide more high level sync mechanism since Java 1.5, but understand low-level sync can help you understand high-level counterparts like java.util.concurrent.locks.Condition, which not only duplicates low-level's function but also provides more flexibility.

The low-level sync mechanism requires 2 things:

  • keyword synchronized
  • methods wait/notify(notifyAll)

BTW, you may notice that wait()/notify() methods are build-in nature for every Java Object.

image

In this article, we try to build a simple producer/consumer model. They both work on an ArrayList, but consumer thread will block if the list is empty. As long as a producer thread put in a Integer into the list, the consumer can resume from the blocking and continue. (In reality, java.util.concurrent.BlockingQueue should be used instead write your own one).

0. How it works

In low-level sync, lock can be acquired from every object. we call it monitor lock, monitor, technically speaking, is the object whose lock you are acquiring. In this demo an ArrayList instance (called queue, see blow java definition) is the monitor we try to get lock from. 

Keyword synchronized(...) is used to acquire locks. although it looks like a methods but it's a keyword( You can  NOT Ctrl + click to goes into its implementation like a method of any Object). Synchronized block is always based on an object instance, the monitor, which is the parameter of synchronized(...)

wait() and notify() can only be called after the lock acquired, which means these methods can only be called within synchronized block.

when wait() invoked,  lock will be immediately release. then thread suspend. You may think "thread steps back from running and enters some kind of a  waiting-room" . The thread stays in "waiting-room" until notify() get called. Then this thread will try to get the lock again.After acquired the lock again, the wait() method finishes.

when notify() invoked, "one of the waiting thread gets out of the waiting-room" . normally this thread will soon get CPU time and  run again. notify() don't release lock, so it normally is put just before end of the synchronized block. When synchronized block ends, lock released.  If there are more threads in "waiting-room" which one get out is random. notifyAll() make all waiting threads get out of the waiting room, but only one of them can get lock.  So these thread will run one by one.Running order is not guaranteed.

1. Demo

There are 3 classes, consumer, producer and main class. Firstly define MyProducer class.

class MyProducer implements Runnable {
private List<Integer> queue;

public MyProducer(List<Integer> queue) {
this.queue = queue;
}

public void put(Integer e) throws InterruptedException {
synchronized (queue) {
System.out.printf("put %d to queue\n", e);
queue.add(e);
queue.notify();
}
}

@Override
public void run() {
try {
put(new Integer((int) (Math.random() * 10))); // random 0 ~ 9
} catch (InterruptedException e) {
e.printStackTrace();
}
}
}

The producer class implement Runnable interface and just input a random number into to list.  The instance variable queue are pass in by constructor, on which lock will be acquired by call synchronized(queue). The notify() is invoked to notify any thread may stay in the "wait-room" that this queue is not empty anymore.  


Secondly define MyConsumer class.

class MyConsumer implements Runnable {
private List<Integer> queue;

public MyConsumer(List<Integer> queue) {
this.queue = queue;
}

public Integer take() throws InterruptedException {
synchronized (queue) {
while (queue.isEmpty()) {
queue.wait();
}
return queue.remove(0);
}
}

@Override
public void run() {
try {
System.out.printf("Try to take from queue\n");
System.out.printf("take %d from queue\n\n", take());
} catch (InterruptedException e) {
e.printStackTrace();
}
}
}

The consumer will try to get an element out of the list. if the list is empty, consumer thread will wait.


Finally the main class.

public class MyArrayBlockingQueue {
static private List<Integer> queue = new ArrayList<>();

public static void main(String[] args) throws InterruptedException {
MyProducer pr = new MyProducer(queue);
MyConsumer cr = new MyConsumer(queue);

Thread p1 = new Thread(pr);
Thread p2 = new Thread(pr);

Thread c1 = new Thread(cr);
Thread c2 = new Thread(cr);

p1.start();
Thread.sleep(1000);
c1.start();
Thread.sleep(1000);
c2.start();
Thread.sleep(5000);
p2.start();
}
}

The main class creates 2 producer threads and 2 consumer threads. The first producer thread p1 put a integer into the list and first consumer thread c1 take it out. Then second consumer c2 try to take from the empty list, it will block until 5 seconds later, the second producer p2 put integer into the list.


2. what's more.


Now you should understand how low-level synchronization mechanism works and the usage for methods wait()/notify() of every objects. In reality, you should use high-level sync mechanism like Lock, Condition and many other power ways provided in package java.util.concurrent and java.util.concurrent.locks.

Thursday, November 12, 2015

Understand Glassfish JDBC configuration by inspecting JDBC DataSource API

When configure DataSource on JEE container Glassfish, There are 2 things need to be set, JDBC Resource and JDBC Connection Pools.

image

What's the difference and why are these two items? What's the relation between them? We can answer that by inspecting the Java JDBC API, mainly in package javax.sql

1. How to connect to DB

To work with DB in Java, the application must have a connections  (java.sql.Connection) to the database.  There are 2 ways to get a connection in JDBC:

  • Method 1, using static method, DriverManager.getConnection(url). This is a very old way, still valid, only used in small standalone applications, doesn't support pooling.
  • Method2, using DataSource interface. Recommended. In most case work with JNDI lookup to get one from a container.

2. The hierarchy of DataSource


jdbc

There are some points need to be noticed about this diagram:

They are all interfaces. No concrete class at all.

There are 3 interfaces related to data source, DataSource/ConnectionPoolDataSource/XADataSource.

Application Java code will ONLY come into contact with the green part. DataSource and Connection.

ConnectionPoolDataSource instance can create PooledConnection instance(pooled...you know,name tells all), XADataSrouce can create XAConnection (for distributed transaction)

The ConnectionPoolDataSource, although may sounds like, but is not a Child of DataSource. In other words, A  ConnectionPoolDataSource instance can't be simply casted to DataSource instance. So inside a DataSource instance, the real work will somehow be delegate to a ConnectionPoolDataSource/XADataSouce.

Same thing applied to Connection. The Connection has nothing to do with PooledConnection, although they looks similar. No casting but delegation.

Up to know you should understand the relationship between JDBC Resource and JDBC Connection Pools in Glassfish Administration GUI. Think JDBC Resource as DataSource and JDBC Connection Pools  as ConnectionPoolDataSource.

3. Using MySQL in Glassfish

Let's use MySQL's official developer guide on "Using Connector/J with GlashFish" as a testify. On this document, the configuration has 2 steps:

  • step1. Creating a Connection Pool, filling in  information like DB's IP address, username and password for make "real" connections to database.
  • step2. Create a JDBC Resource. choose a pool created in step 1 and set a JNDI name for it.  We can say the JDBC Resource HAS-A pool.

The steps can pretty much demonstrate the hierarchy of DataSource in JDBC API, which once get understood will make the configuration steps make sense and easy to remember.

Tuesday, November 10, 2015

Break down class "Files" of java 7 NIO.2

Since Java 7, File related IO operation has been redesigned. The following 3 classes/interfaces are key for file related operations: Path,Paths, and Files. They are all in package java.nio.file. Among all these 3, Files is the most fundamental one.

0. Brief about Path and Paths

Paths is a concrete classes which only has method get(...) to create Path instance. so Paths is just a factory class whose only usage is get a Path instance from a input String or URL to static method get(...)

Path is an interface designed to replace old-styled java.io.File class.  First thing to notice is that Path is not a class but a interface, can't create instance with keyword new. So Paths was introduced for doing the initial.  Second thing need to know about Path is its all method will not do all really I/O, just string manipulation. All methods of Path will not touch anything on the HD. For example method to normalize a path "/usr/local/../bin/../tmp" to path "/usr/tmp" located in class Path.

Then who make the "real" I/O operation? The class Files - this beauty has it all! 

1. Anatomy of class Files

Files is a concrete class only has plenty of static methods. All most all methods need Path instance as its first parameter.

java_nio_file

There seems a lot of stuff, but take it easy, let's go through them step by step. The functions can be categorized in 4 groups.  Also The diagram contains most used methods of Files, but not all. The methods' signature are simplified just for easy to understand without bothering too many details.

  • group 1, basic manipulation. Create/Delete/Rename/Move a file or directory on the file system.
  • group 2, go through directory. 2 methods used to list directory contents without and with subdirectories respectively.
  • group 3, read/write content of file.
  • group 4. get/set file related attributes (the rest parts on the above diagram with pink/blue/green colors)

1.1 Basic I/O manipulation

The methods in these group are pretty self-explained.  By utilizing methods in this group you should be able solve followings:

  • How to create/copy/rename/move/delete a single file?
  • How to create/copy/delete empty directory, rename/move non-empty directory?

There is no single method can copy/delete non-empty directory, has to fulfill that with methods in group 2.

1.2 Go through directory

There are 2 methods in this group. Method newDirectoryStream() works just like command-line 'ls' or 'dir', not recursively deep into subdirectories. On the contrary, walkFileTree() recursively go though every subdirectories.

How to list a directory, only one tier?

  public static void listDirectory(String dir) throws IOException {
Path path = Paths.get(dir);
DirectoryStream<Path> dirStream = Files.newDirectoryStream(path, "*.java");

for (Path p:dirStream) {
// do something will every file/subdir in this directory
System.out.println(p.getFileName());
}
}

How to go through a direcoty recursively, include all subdirectories ?

  public static void goThoughDirectoryRecursively(String dir) throws IOException {
Path path = Paths.get(dir);
Files.walkFileTree(path, new SimpleFileVisitor<Path> () {
@Override
public FileVisitResult visitFile(Path path, BasicFileAttributes attrs) throws IOException {
System.out.println(path); // print out name of every file/directory
return FileVisitResult.CONTINUE;
}
});
}

The walkFileTree() usage is a standard incarnation of "Visitor" design pattern.


1.3 Read/write file contents


These group are for reading or writing contents of file. Use Reader/Writer for text file and InputStream/OutputStream for binary file. Also there are helper methods to read all contents at once for small files.

  public static void readSingleFile(String fileName) throws IOException {
Path path = Paths.get(fileName);
BufferedReader reader = Files.newBufferedReader(path, StandardCharsets.UTF_8);

// print the file content to screen
String line;
while ((line = reader.readLine()) != null) {
System.out.println(line);
}
reader.close();
}

1.4 Get/set file attributes


The file and directory on file system can have many attributes, some basic attributes like creation/access/modification time. some of the attributes are specific to windows, like is the file hidden? Some of them are specific to Unix, like is the file writable to other users?


There are 3 ways to get/set file attributes:

  • Use simple shortcut static methods provided by class Files to test and set  (pink on the diagram)
  • Use attributes related classes  like XXXFileAttributes and XXXFileAttributeView (blue on the diagram, see explanation below)
  • Use powerful shortcut static methods getAttribute()/setAttribute() (green on the diagram, see blow)

1.4.1 simple shortcut


The methods for simple shortcuts are ....simple. yes, they are strait forward.  But simple shortcuts don't cover all attributes just some most used ones. Also you may already notice that fewer methods for set than get. ( There is a 'hole' on up-right corner). Shortcut methods in fact just use other attributes related classes we will see below for simplicity.


1.4.2 attributes related classes


Check the blue part on the diagram, left 3 named like XXXFileAttributes, which are read-only. Right 3 named like XXXFileAttributeView are used for file attribute modification.  The XXX here in class name is called view-name, we'll see the usage of view-name very soon.


Here is code snippet to read file attributes on windows.

  // test if a file is read-only on Windows
public static boolean isFileReadOnly(String fileName) throws IOException {
Path path = Paths.get(fileName);
DosFileAttributes dosAttr = Files.readAttributes(path, DosFileAttributes.class);
return dosAttr.isReadOnly();
}

Here is code snippet for modify file attributes on Linux

  // set file permission to "rw-r--r--" on Linux
public static void modifyFilePermission(String fileName) throws IOException {
Path path = Paths.get(fileName);
PosixFileAttributeView posixAttrView = Files.getFileAttributeView(path, PosixFileAttributeView.class);
posixAttrView.setPermissions(PosixFilePermissions.fromString("rw-r--r--"));
}

1.4.3 powerful shortcut


Unlike simple shortcuts, powerful shortcuts only have a pair of getAttribute(path,attributeString...)/setAttribute(path,attributeString...) , but can cover all file attributes. The format of string parameter attributeString is  [view-name:]attribute-name. 

  • The default value for view-name is basic
  • The attribute-name is in lower case.
  • Need type-casting because get/set only return or use Object instance as values 

We have a code snippet above isFileReadOnly(...) to test if a file is read-only on windows. Here is the equivalent.

  // test if a file is read-only on Windows 
public static boolean isFileReadOnly(String fileName) throws IOException {
Path path = Paths.get(fileName);
return (boolean) Files.getAttribute(path, "dos:readonly");
}

2.Recap


Get a clear view of class Files will give you a good understanding of file related I/O functions in Java 7 + NIO.2.  Again let's review these 4 groups :

  • group 1, basic manipulation. Create/Delete/Rename/Move a file or directory on the file system.
  • group 2, go through directory. 2 methods used to list directory contents without and with subdirectories respectively.
  • group 3, read/write content of file.
  • group 4. get/set file related attributes (the rest parts on the above diagram with pink/blue/green colors)

How to understand < ? super Child> in Java Generics

In Java, polymorphism does NOT apply to generic types. So suppose class Child extends from class Parent, then the following 2 lines, only the first can pass compilation.

  Parent var = new Child();  // compiler is happy with this
ArrayList<Parent> myList = new ArrayList<Child>(); // compilation error

The way to bring the idea of inheritance into Java generic types is using <? extends Parent> or <? super Child>. In this article we'll see how to understand the meaning of syntax <? super Child> in Java generics. 


Check another article on how to understand syntax <? extends Parent> in Java generics.


0. Clarify concept

  interface Animal{ }
class Dog implements Animal { }
class Cat implements Animal { }

public void test() {
// make sure you understand these 2 lines
List<Animal> pList = new ArrayList<Animal>();
pList.add(new Dog()); // It's fine
}

There is a List of type Animal variable pList. Can a Dog instance be added to this list? The answere is yes, because the Dog IS-A Animal;


1. Basic meaning


<? super Child> refer to any class that see class Child as its descendent.


<? super Child> can be used for variables definition and  method's parameter, but most used in latter.


2. Make a collection (kind of) write-only


If generic types' syntax <? super Child> used as method's parameter definition, then the parameter is (kind of) write-only. Usually it's used with a collection parameter.


Why ? Let's image you have a method  addDogToList defined like

  void addDogToList (List<? super Dog> myList) {
myList.add(new Dog()); // design to add Dog to collection

Cat obj = (Cat) myList.get(0); // Compile OK, but risky!
// Never explicitly cast type
// when using generic types
}

The addDogToList has a paramenter myList as type List<? super Dog>.  So the following usage are both correct since Dog instance can be add to a either Dog list or Animal List (see charter 0. clarify concept above)

  addDogToList(new ArrayList<Dog>());
addDogToList (new ArrayList<Animal>());

we just explained why "write" to that list is OK, but why "write-only"? Technically speaking, you can read elements from collection marked by , but the return type is Object, which means you can cast it to any Class you want and the compiler will let you pass anyway, like what we did above, we cast element to type Cat, but during runtime that normally means a disaster. Furthermore, the whole meaning of Generics is to eliminate type casting for the sake of type-safe. That's why call it "kind of write-only" (you can read, but don't)


3. Recap


When use a collection variable with <? super Child> style, it means " Hey, I'm going to add Child instance into this collection, just make sure the argument passed in can hold new Child instance."

Monday, November 9, 2015

How to understand < ? extends Parent> in Java Generics

In Java, polymorphism does NOT apply to generic types. So suppose class Child extends from class Parent, then the following 2 lines, only the first can pass compilation.

  Parent var = new Child();  // compiler is happy with this
ArrayList<Parent> myList = new ArrayList<Child>(); // compilation error

The way to bring the idea of inheritance into Java generic types is using <? extends Parent> or <? super Child>. In this article we'll see how to understand the meaning of syntax <? extends Parent> in Java generics. 


Check another article on how to understand syntax <? super Child> in Java generics.


1. Basic meaning


<? extends Parent> means any class that see class Parent as its ancestor. Parent can be either a class or an interface. (yes, interface is OK although keyword extends is used)


<? extends Parent> can be used for variables definition and  method's parameter


2. Make a collection read-only


If generic types' syntax <? extends Parent> used as method's parameter definition, then the parameter is read-only. Usually it's used with a collection parameter, and that collection is read-only inside the method.


Why ? Let's image you have a method printName defined like

  interface Animal{
String getName();
}
class Dog implements Animal { // omit getName implementation }
class Cat implements Animal { // omit getName implementation }

void printName(List<? extends Animal> animals) {
// Good to read from List
for (Animal animal : animals) {
System.out.println (animal.getName());
}

// Error when write to list, compile fail
animals.add(new Dog());
}

The printName has a paramenter animals as type List<? extends Animal>.  So the following usage are both correct since Dog and Cat are all subclass of Animal.

  printName (new ArrayList<Dog>());
printName (new ArrayList<Cat>());

Now let answer the question about why read-only. In method printName, every element out of list can be guaranteed IS-A type Animal, that's why read from list is OK. But when try to add new element,  the compiler has no idea the input list animals has Dog or Cat in it. Because anyone can call this printName method with eight Dog list or Cat list. This information is unknown to compiler, so all the java compiler can do is  fail there to avoid making severe mistakes adding  a Dog instance into a Cat list.


3. Recap


When use a collection variable with <? extends Parent> style, it means " Hey, I'm gonna use elements in this collection and make sure every one in this collection fulfill IS-A type Parent requirement. But I promise will never ever try to add anything back into this collection"

Thursday, November 5, 2015

Glob in Java file related match

Globs are not regular expression. Glob is simpler and earlier than regular expression. For historical reasons, glob are more used as file name or file path filtering.

In Java 7 NIO package has 2 places that glob appears as file names or file path filter. One is when you create a PathMatcher to test if a java.nio.file.Path instance matches a patten like

Path path = Paths.get("abc.java");
PathMatcher matcher = FileSystems.getDefault().getPathMatcher("glob:*.java");
boolean isJavaFile = matcher.matches(path); // true

The other is when create a DirectoryStream to iterate all files and subdirectories( not including files under subdirectories, just like the command 'dir' or 'ls')

Path dir = Paths.get("/tmp");
try (DirectoryStream<path> stream = Files.newDirectoryStream(dir,"[vt]*")) {
for (Path path : stream) {
System.out.println(path.getFileName()); // only files start with 'v' or 't'
}
}

Here are the rules for glob:


  • * match any char except a directory boundary
  • ** match any char include a directory boundary
  • ? match any ONE char
  • [] same as regular express, like [0-9] match any ONE digit.
  • {} match a collection of patten separated by comma ','. Such as {A*, b} means either a string start with 'A' or a single char 'b'.

More examples:

pathglobmath result
/tmp/src/main/Demo.java*.javafalse
/tmp/src/main/Demo.java**.javatrue
/tmp/src/main/Demo.java/tmp/*/*.javafalse
/tmp/src/main/Demo.java/tmp/**/*.javatrue
/tmp/src/main/Demo.java/tmp/**/[dD]*.javatrue
/tmp/src/main/Demo.java/tmp/**/[aA]*.javafalse

Tuesday, November 3, 2015

A brief in Java string format

When to format a Java String using System.out.printf or System.out.format, The syntax for the format is :

%[arg_index$][flags][width][.precision]<conversion_char>

Here are more explanation:
  • arg_index    An integer with suffix '$'. begin with 1, not 0. The position of the args.
  • flags 
    - Left-align, default is right-aligned
    + Include +/-before number
    0 Pad with zeros before number
    , User comma to separate number
    ( Enclose negative numbers in parentheses. '-' will not display
  • width  The width of the printed String, very useful to get table like output
  • precision  For float/double, specify the digits after "."
  • Conversion_char
    b boolean
    c char
    d integer
    f float/double
    s string

Below is a simple example for demostration

    System.out.printf("<%-3s><%6s><%10s><%10s>\n","Id","Gender","Name","Balance");
System.out.printf("<%3$03d><%2$6s><%1$10s><%4$+10.2f>\n", "Tom","M",1,688.972); // arg_indx
System.out.printf("<%03d><%6s><%10s><%+10.2f>\n", 2,"M","Jerry",-12.345);
System.out.printf("<%03d><%6s><%10s><%(10.2f>\n", 3,"F","Rose",-12.345);

The "<"  and ">" are added to make the border visible. The outputs are:

<Id ><Gender><      Name><   Balance>
<001>< M>< Tom>< +688.97>
<002>< M>< Jerry>< -12.35>
<003>< F>< Rose>< (12.35)>

Friday, October 30, 2015

How to use embedded Java DB (Derby) in maven project

For now, Java DB is actually just Apache Derby with a different name.  In the following of the article, we will call it Derby. It  comes with JDK installation. ( Although what's normally used in maven project is not the same binary install in local JDK directory)

Using embedded Java DB means the database will run in the same JVM as your application. The Java DB engine actually gets started when you try to connect to it by JDBC. When the application exits, the database also exits. If you choose to run the Java DB total in memory, when the JVM stops, the data will be gone. Or you can choose to store the data on local file system to make them usable during multiple runs.

Java DB (Derby) is mostly used for convenience in development. No external database is needed even you have code need to play with RMDB.

0. What you need

  • JDK 6+ (JDK 7 in this demo)
  • Maven 3.2 +

1. POM file

There's only one dependency needed to use Derby database.

<project xmlns="http://maven.apache.org/POM/4.0.0" xmlns:xsi="http://www.w3.org/2001/XMLSchema-instance"
xsi:schemaLocation="http://maven.apache.org/POM/4.0.0 http://maven.apache.org/xsd/maven-4.0.0.xsd">
<modelVersion>4.0.0</modelVersion>

<groupId>com.shengwang.demo</groupId>
<artifactId>javadb-derby-embedded-basic</artifactId>
<version>1.0</version>
<packaging>jar</packaging>

<name>javadb-derby-embedded-basic</name>
<url>http://maven.apache.org</url>

<dependencies>
<dependency>
<groupId>org.apache.derby</groupId>
<artifactId>derby</artifactId>
<version>10.8.3.0</version>
</dependency>
</dependencies>

<!-- Use Java 1.7 -->
<build>
<plugins>
<plugin>
<groupId>org.apache.maven.plugins</groupId>
<artifactId>maven-compiler-plugin</artifactId>
<version>2.5.1</version>
<configuration>
<source>1.7</source>
<target>1.7</target>
</configuration>
</plugin>
</plugins>
</build>
</project>

Since the version of Java DB comes with JDK 7 is 10.8.3.x, we also use 10.8.3.0 in our maven project. If just using in-memory database(see below), the version used in maven actually doesn't matter. But if database file stores on file system and you want to check the database content after application finishes, you'd better use the same version as from JDK, so the 'ij' tool in $JAVA_HOME/db/bin can open the database without version conflicts.


2. When the embedded database starts


The database starts when you java code try to connect to it by using standard JDBC. How the derby work depends on the way to connect to it, or in other words, depends on the connection url. Suppose we need to connect to a database named 'demo'.


In-memory database, url looks like: jdbc:derby:memory:demo;create=true


'demo' is the database name and can be any string you choose, "memory" is a key word to tell Derby  to goes to all-in-memory mode.


File-based database, url looks like: jdbc:derby:c:\Users\shengw\MyDB\demo;create=true


'c:\Users\shengw\MyDB\demo' is the directory to save database files on local file system. (On windows its actually jdbc:derby:c:\\Users\\shengw\\MyDB\\demo;create=true because of the String escaping)


'create=true' is a Derby connection attribute to create the database if it doesn't exist. If use in-memory database, this attribute is mandatory.


3. A complete example


This is a complete hello world level example using embedded Derby database in Maven project. The HelloJavaDb.java lists below.

package com.shengwang.demo;

import java.sql.Connection;
import java.sql.DriverManager;
import java.sql.ResultSet;
import java.sql.SQLException;
import java.sql.Statement;

public class HelloJavaDb {
Connection conn;

public static void main(String[] args) throws SQLException {
HelloJavaDb app = new HelloJavaDb();

app.connectionToDerby();
app.normalDbUsage();
}

public void connectionToDerby() throws SQLException {
// -------------------------------------------
// URL format is
// jdbc:derby:<local directory to save data>
// -------------------------------------------
String dbUrl = "jdbc:derby:c:\\Users\\shengw\\MyDB\\demo;create=true";
conn = DriverManager.getConnection(dbUrl);
}

public void normalDbUsage() throws SQLException {
Statement stmt = conn.createStatement();

// drop table
// stmt.executeUpdate("Drop Table users");

// create table
stmt.executeUpdate("Create table users (id int primary key, name varchar(30))");

// insert 2 rows
stmt.executeUpdate("insert into users values (1,'tom')");
stmt.executeUpdate("insert into users values (2,'peter')");

// query
ResultSet rs = stmt.executeQuery("SELECT * FROM users");

// print out query result
while (rs.next()) {
System.out.printf("%d\t%s\n", rs.getInt("id"), rs.getString("name"));
}
}
}

The demo uses derby database, creates a table 'users', inserts 2 rows into the table and prints the query result set.  The whole maven project hierarchy is :


image


After running the HelloJavaDb example, you can verify the database, because we are not using derby in all-in-memory mode.  After running, the database files will appear on local file system like this. 


image


If you connect to the database in command line, you can see the 2 rows add from your Java code. 'ij' is a tool provided by Derby works as a sql client.


image

Tuesday, October 27, 2015

How to use Java parallel Fork/Join framework - Hello world example

Since Java 7, fork/join framework has be introduced in to Java API. The main difference between fork/join and other multi-threading mechanism like executor or thread pools is that: traditional multithreading focuses on "let every task has the chance to run simultaneously", fork/join framework focuses on "saturate the CPU usage, make full use of the hardware resources".

0. Why fork/join?

So what's the problem for traditional thread pools, or why does fork/join need to be introduced since there are already many ways for working in parallel?Fork/join framework normally used with single task, which is BIG. Let's suppose the CPU has 4 cores. To make max usage of the quad-core CPU, you don't want any core idle while others are still busy with some work.  But If you split the big task into 4 subtasks and give them to each core to run using the traditional thread pools, when every thread terminate, a core will become idle while the rest cores are still struggling. It's a kind of waste of CPU resources. The fork/join framework can prevent this from happening. Every core keeps busy  until the whole job is done.  When a thread(CPU core) is idle or done with it's workload, it will try to help other threads instead of just sit there doing nothing. In fork/join framework, it's called work stealing.

Work stealing is the key feature of the fork/join framework.

1. Working theory

In brief, the fork/join framework also use a thread pool, java.util.concurrent.ForkJoinPool, but unlike traditional thread pool, every thread in this pool has a queue. Every thread can access each other thread's queue. The queue of each thread can be treat as a work load buffer.

1.1 What happens when firstly a thread get a task

The fork/join framework starts in this way, suppose the first thread get the task is call Thread A:

step 1. When thread A gets a task, if it's small enough, do the real calculation; if still big, the task will be cut into 2 subtasks.

step 2. The thread A will keep working on one of the subtasks, and put the rest into thread A's queue (its own queue).

step 3. An Idle thread, thread B, can take subtasks out from thread A's queue, which is called work stealing. Then on thread B, same process repeats from step 1

After a big task submits to one thread initially, it will soon propagated to ALL threads of the fork/join thread pool. Something's worthy to mention is that Thread A will keep recursively cut task->queue 1/2->cut 1/2 task-> queue 1/4 -> cut 1/4-> queue 1/8...... until the task is small enough. Recursion is also a feature of fork/join framework.

By default the fork/join thread pool will has threads size exactly same as the available threading unit that you CPU can run simultaneously. For example a Quad-core CPU with Hyper-Threading(2 threads on each physical core), the pool will has 4*2 = 8 threads.  So after task has been given to the fork/join pool, all threads/ all CPU will be occupied.

1.2 What happens when any threads finish a subtask

If thread X gets a task and splits it into 2 subtasks, it puts half in to its queue and starts working on the other half. When the second half is done, it will try to check if the first half is done.

  • if  the first half is done, then it can continue to work stealing.
  • if the first half  has been stolen and processed by other thread,  thread X has to wait until this half finish.
  • if the first half is still in the queue, thread X will start to process the first half itself recursively, which means cut the first half, queue 1/4 and work on the other 1/4.

2. Java API

In API level, when to put a subtask into the queue, call fork(). when to process a some pieces of work ,call compute(). when to wait for rest to finish call join(), These 3 methods are key methods of the fork/join framework, which are also where the framework's name comes from. 

Always call fork() before compute() and join() so other threads can have the chance to help sharing the workload

In package java.util.concurrent, there are 4 classes key to fork/join framework.

  • ForkJoinPool - Thread pool for fork/join framework. Implements ExecutorService interface.
  • ForkJoinTask -  Abstract class, has fork() and join() method, as parent class for the next 2 children. 
  • RecursiveTask - Abstract class extends ForkJoinTask, only abstract method is compute()
  • RecursiveAction - Abstract class extends ForkJoinTask, only abstract method is compute()

The only difference between RecursiveTask and RecursiveAction is that RecursiveTask's compute() has return, but RecursiveAction's compute() doesn't. (Task has return, action doesn't)

3. Demo

We have big char array, 100M items. Every item in this array is one upper case letter from A-Z.  The application tries to count how many letter 'A' in this big array. By using fork/join framework, the array will be divided into small area for each thread to go through.  Let's first see the main class.

package com.shengwang.demo;

public class ForkJoinDemo {
private static final int ARRAY_SIZE = 100_000_000;
private static char[] letterArray = new char[ARRAY_SIZE];

private static int countLetterUsingForkJoin(char key) {
int total = 0;
ForkJoinPool pool = new ForkJoinPool(); // create thread pool for fork/join
CountLetterTask task = new CountLetterTask(key, letterArray, 0, ARRAY_SIZE);
total = pool.invoke(task); // submit the task to fork/join pool

pool.shutdown();
return total;
}

public static void main(String[] args) {
char key = 'A';
// fill the big array with A-Z randomly
for (int i = 0; i < ARRAY_SIZE; i++) {
letterArray[i] = (char) (Math.random() * 26 + 65); // A-Z
}

int count = countLetterUsingForkJoin(key);
System.out.printf("Using ForkJoin, found %d '%c'\n", count, key);
}
}

The main class is simple, main() first fill a big array with random upper case letters, then call the countLetterUsingForkJoin(), in which a ForkJoinPool is created and task submit to it.  After finishing whole task and get the final result, the pool shuts down and result returned.  The task class CountLetterTask is the kernel of this demo and it's shown below.

package com.shengwang.demo;

import java.util.concurrent.RecursiveTask;

class CountLetterTask extends RecursiveTask<Integer> {

private static final long serialVersionUID = 1L;
private static final int ACCEPTABLE_SIZE = 10_000;
private char[] letterArray;
private char key;
private int start;
private int stop;

public CountLetterTask(char key, char[] letterArray, int start, int stop) {
this.key = key;
this.letterArray = letterArray;
this.start = start;
this.stop = stop;
}

@Override
protected Integer compute() {
int count = 0;
int workLoadSize = stop - start;
if (workLoadSize < ACCEPTABLE_SIZE) {
// String threadName = Thread.currentThread().getName();
// System.out.printf("Calculation [%d-%d] in Thread %s\n",start,stop,threadName);
for (int i = start; i < stop; i++) {
if (letterArray[i] == key)
count++;
}
} else {
int mid = start + workLoadSize / 2;
CountLetterTask left = new CountLetterTask(key, letterArray, start, mid);
CountLetterTask right = new CountLetterTask(key, letterArray, mid, stop);

// fork (push to queue)-> compute -> join
left.fork();
int rightResult = right.compute();
int leftResult = left.join();
count = leftResult + rightResult;
}
return count;
}
}

Let's go through class CountLetterTask. It extends RecursiveTask<Integer> which mean final result of the task is an Integer. To avoid creating copy of the original big array, the reference of the big array will be send in as a constructor parameter. The current task size is defined by the start(inclusive) and stop(exclusive) index in the array. The criteria to say whether the current task is small enough is defined as a constant variable ACCEPTABLE_SIZE. Here when the subtask deal with part of the array less than 10k is considered as "small enough".


The most interesting part is the compute() method, it first checks if the current task is smaller enough, if so,  do the real calculation. If not, the array range will be divided into 2 parts. One task becomes two subtasks, each is also a CountLetterTask instance. Put the first part into queue then call compute() on the second half. The task will be recursively cut small until it's "small enough".  Then call the join() to make sure  whole task is done. Remember fork() has to run before compute() and join()


4. Run 


image


From the screenshot, CPU resources are fully used for the big task. ( Since the task will only take less than 30ms also on my PC to finish, the screenshot actually comes from a even bigger array running in a loop for many times)

In practical the most used thread methods before thread.start()

The java.lang.Thread class is the core of the low level multi-threading in Java. Almost every java developer know start a new thread is very simple. first, create a instance from Thread or subclass of Thread, then call start() method of that instance. WALA, the new thread is in runnable state and ready to run.

In a nontrivial project, very possibly there are some other methods need to be invoked after you create the thread instance and before start() get called. Let's take a look at these candidates in a hello world level demo.

package com.shengwang.demo;

class MyDummyTask implements Runnable {

@Override
public void run() {
String threadName = Thread.currentThread().getName();
System.out.printf("Start working in %s\n", threadName);
throw new RuntimeException("some thing wrong");
}

}

public class MyThread {

public static void main(String[] args) throws InterruptedException {
MyDummyTask r = new MyDummyTask();
Thread t = new Thread(r);

//-----------------------------
// opt 1. set thread name
//-----------------------------
t.setName("helloThread");

//-----------------------------
// opt 2. set Exception handler
//-----------------------------
t.setUncaughtExceptionHandler(new Thread.UncaughtExceptionHandler() {

@Override
public void uncaughtException(Thread t, Throwable e) {
System.out.println(formatException(t, e));
}

private String formatException(Thread t, Throwable e) {
StackTraceElement[] ste = e.getStackTrace();
String exceptionRootLocation = ste.length > 0 ? ste[0].toString() : "Root cause not specified";

StringBuilder sb = new StringBuilder();
sb.append("Thread Exception [");
sb.append(t.getName());
sb.append("]: ");
sb.append(e.toString());
sb.append(" at <");
sb.append(exceptionRootLocation);
sb.append(">");
return sb.toString();
}

});

//-----------------------------
// opt 3. set daemon
//-----------------------------
t.setDaemon(true);

t.start();
t.join();
}
}

1. Set thread's name


This is the most possible thing you may want to do before start the new thread by calling setName(). The default thread name will be 'Thread-n' if create by hand or 'pool-x-thread-y' if created by default ThreadFactory of Execuors. It will be very much helpful to set it  a meaningful name.


2. Set the exception handler


In production, it's not rare to see a  thead in multi-thread application raises exception. This exception need to be handled or logged to make the application get improved. The developer should set a customized handler to make this done using setUncaughtExceptionHandler()


In Java when uncaught Exception happens in thread, the order to handle the exception is thead's uncaughtExceptionHandler (like we set in the demo above)-> thread group's uncaughtException() method -> default uncaught exception handler. You can choose which layer you want to cut in. 


3. Set Daemon


This is much more optional. It depends on your application. JVM will wait for any non-daemon thread to finish before application can finish. So if  sub threads' interruption is not your concern, You an set them to daemon so you can quite the application fast.


4. More


In real project, the concurrency is based more on java.util.concurrent.ExecutorService instead of using creating Thread directly. So a customized ThreadFactory will always be used to set the properties on the thread instances before thread instances get involved in any kind of thread pools.

Monday, October 19, 2015

Understand Java primitives wrapper class comparison

Java has a wrapper class for every primitive types, Such as  Integer to int, Boolean to boolean, Short to short, Character to char and etc. Also we all know that when compare two java objects,  "a==b" only  check if a and b refer to the same objects, while "a.equals(b)" normally can compare the real value that instance a and b really presents. That is true.

So in short, always use equals() to compare primitives wrapper class. 

In this article, let's use some demos to help you get a clearer understand.

All demos used in this article have been tested under JDK 1.7.

Demo 1

package com.shengwang.demo;

public class DemoMain {

public static void main(String[] args) {
Integer i1,i2;

i1 = new Integer(5);
i2 = new Integer(5);

System.out.println(i1==i2); // false, i1,i2 refer to 2 objects
}
}

This demo is very straitforward, since i1 and i2 refer to 2 different Integer instances, the "i1==i2" condition will return false.


Demo 2

package com.shengwang.demo;

public class DemoMain {

public static void main(String[] args) {
Integer i1,i2;

i1 = 5;
i2 = 5;

System.out.println(i1==i2); // true, why?
}
}

This demo 2 is very similar to demo 1, but use i1=5 to initial the Integer instance instead of using keyword new. The output turns out that i1==i2 is true, why? Because in java, an internal java.lang.Integer instance will be created automatically before assign constant int 5 to an java.lang.Integer variable. This is called auto-boxing in Java. In order to save memory, there will be only one internal instance if the primitive value is same. Which means i1 and i2 do point t the same internal Integer object. So the output of demo 2 is true.


Let's step a little bit further.

package com.shengwang.demo;

class ClassA {
public Integer i1 = 5;
}

class ClassB {
public Integer i2 = 5;
}

public class DemoMain {

public static void main(String[] args) {
System.out.println(new ClassA().i1 == new ClassB().i2); // true again
}
}

It still uses primitive constant to initial wrapper class instance by auto-boxing. The same rule applies even variables are in different class instances.

Recap

  • Only use equals() to compare java primitives wrapper class instances.
  • If you wonder why sometimes "==" also get the  appeared right result? That's because JVM try to save memory, auto-boxing for constant always using the same internal object if the primitive value is same.

Friday, October 9, 2015

Use Java regular expression for multiline string

There are 2  points worth to point out when using Java regular expression to parse multi-line string.

  • The period "." doesn NOT match line break, unless you set extra flag to your pattern instance.
  • The "^" and "$" mean different in single(default) and multi line mode.

1. period "." does not match line break

Usually the period "." is used to match any thing, but by default it doesn’t match line break, such as "\r","\n". A Patten flag Pattern.DOTALL need to be set explicitly to make it match line break.  This is important to know when you use matches(). All String/Pattern/Matcher Class have matches() method which try to match the whole input string with the regex pattern. Since "\n" will break patterns like ".*", then the whole string match breaks, you may get unexpected result.

    String input = "11abc22\n33abc44";  //multi-line input
String reg = ".*abc.*";

Pattern p0 = Pattern.compile(reg);
Matcher m0 = p0.matcher(input);
System.out.println(m0.matches()); // print false

Pattern p1 = Pattern.compile(reg,Pattern.DOTALL); // set DOTALL flag
Matcher m1 = p1.matcher(input);
System.out.println(m1.matches()); // print true

The regex input is a multi-line string. Since the "\n" doesn't fit in pattern ".*" default, the first m0.matches() call returns false.

To make the period "." also matches  line break, add Pattern.DOTALL flag to the pattern. 

2. Meaning of "^" and "$" in single and multi line mode


The default mode for Java regular expression is single line mode. Use Pattern.MULTILINE to turn on multi-line mode.

The meaning of "^" and "$" in single and multi line mode.

 In default modeIn multi-line mode
^The beginning of the whole input StringThe beginning of every line.
$The end of the whold input StringThe end of every line.

Let's check the following demo code RegexMultiline.java for better understanding.

package com.shengwang.demo;

import java.util.regex.Matcher;
import java.util.regex.Pattern;

public class RegexMultiline {
// ##x=6##
// ##x=8##
static String input = "##x=6##\n##x=8##";

public static void main(String[] args) {

String reg = "^.*x=(\\d+).*$";

// case 1
System.out.println("--> single line mode"); // default single-line
Pattern p1 = Pattern.compile(reg);
searchPatternInMultiLineText(p1);


// case 2
System.out.println("--> single line mode with DOTALL"); // single-line + dotall
Pattern p2 = Pattern.compile(reg,Pattern.DOTALL);
searchPatternInMultiLineText(p2);


// case 3
System.out.println("--> multi line mode");
Pattern p3 = Pattern.compile(reg, Pattern.MULTILINE); // multi-line mode
searchPatternInMultiLineText(p3);

}

public static void searchPatternInMultiLineText(Pattern p) {
boolean isFound = false;

Matcher m = p.matcher(input);
while (m.find()) {
System.out.println("x="+m.group(1));
isFound = true;
}

if (!isFound) {
System.out.println("No pattern found");
}
}
}

Run this demo and the result is:

--> single line mode
No pattern found
--> single line mode with DOTALL
x=8
--> multi line mode
x=6
x=8

Let go through the demo code. There are 3 cases try to match the same input text with the same pattern "^.*x=(\\d+).*$". The only differences among them are the flags for the pattern instances. 


Case 1,  pattern instances in  single mode, (default mode with no extra flag), The ^ and $ match the beginning and ending of the whole input text. Since "\n" can not fit in pattern ".*",  in fact nothing in pattern matches "\n", so the pattern match will fail.


Case 2, single mode with DOTALL flag, ".*" now can cover "\n". The ^ and $ match the beginning and ending of the whole input text. Since default is greedy matching, so the first ".*" will try to consume as much as possible, the whole input will have only one match.


Case3, in multi-line mode. The ^ and $ match the beginning and ending of every line. Since there are 2 lines in the input String, there are 2 matches, one for each line. 


Be careful when using Java regular expression for multi-line input text match, same input and same pattern can get different results when working in different modes.

Case-insensitive regular expression in Java

The java.util.regex.Pattern has several flags which are very helpful.  One of them is CASE_INSENSITIVE

Just add this flag when creating pattern instance.  Everything else follows normal regex usage.

Here is a hello world level demo for case-insensitive regular expression in Java.

package com.shengwang.demo;

import java.util.regex.Matcher;
import java.util.regex.Pattern;

public class RegexCaseInsensitive {

public static void main(String[] args) {
String input = "ABC";
String regex = "abc";
boolean matchResult;
Pattern p = Pattern.compile(regex, Pattern.CASE_INSENSITIVE); // add flag here
Matcher m = p.matcher(input);
matchResult = m.matches();
System.out.println("matchResult="+matchResult); // print "matchResult=true"
}
}
In fact case-insensitive regular expression can also be enable by add embedded flag expression(?i). But I personally prefer using Pattern.CASE_INSENSITIVE flag for code readability.

For most basic regular expression Java API usage, check out article “The basic regular expression API in Java”

Powered by Blogger.

About The Author

My Photo
Has been a senior software developer, project manager for 10+ years. Dedicate himself to Alcatel-Lucent and China Telecom for delivering software solutions.

Pages

Unordered List