Showing posts with label Eclipse. Show all posts

Wednesday, March 2, 2016

How to separate integration test from unit test

0. Environment

  • Maven  3.2 +
  • Eclipse
  • JUnit 4.+

This article supposes you already know how to use maven plugin failsafe for integration test.

1. Final goal

Let's clarify the word "separate" first. It means:

  • Unit tests and integration tests are in different directories, but stay in the same maven project (not in another maven module project).

Also we want achieve these goals:

  • In Eclipse, you can choose to only run unit tests alone,  without integration tests
  • In Eclipse, you can choose to only run integration tests alone,  without unit tests
  • In maven command line, you can choose to only run unit tests alone,  without integration tests (mvn test)
  • In maven command line, you can choose to only run integration tests alone,  without unit tests (mvn clean test-compile failsafe:integration-test)
  • In maven command line, you can also run them both with a single command. (mvn verify)

The final directory hierrarchy looks like below.

image

The project hierrarchy in Eclipse looks like below.

image

Just remember Eclipse and Maven have different ways to manage build process, so both Eclipse and Maven pom file need to be configured respectively.

2. Create directories for integration test

Create 2 directories in your project

  • src/integration/java
  • src/integration/resources

3. Configure in Eclipse

3.1 add source folder

In Eclipse, right click you project's name -> new -> Source Folder.  ( Not folder, but Source Folder)

image

The click button  "Brower" for Folder name.

 image

Select /src/integration/java, then OK, to add this directory to Eclipse build path.

image

Now you should see a new source folder added to you project in Eclipse.

image

Repeat to add another source folder /src/integration/resources. Now you project in Eclipse should looks like below.

image

3.2 Config Eclipse build path

Since integration tests are also tests, you don't want them mixed with main code. So you need to change the "Build Path" in Eclipse. By default, newly added source folders are treated as main code/resources.

Right click project name -> Build Path -> Configure Build Path

image

Change Output folder for both /src/integration/java and /src/integration/resources to target/test-classes

image

Up to now, you should be about to run unit test and integration tests separately, by choose different dir to run.

4. Configure pom.xml

By default, maven can only have 1 test source directory, which point to ${project.basedir}/src/test/java. To add our newly created dir to maven as test source/resource, we need to utilize plugin 'build-helper'.

4.1 config failsafe plugin

Add failsafe plugin in <build>

  <plugin>
    <groupId>org.apache.maven.plugins</groupId>
    <artifactId>maven-failsafe-plugin</artifactId>
    <version>2.19.1</version>
    <configuration>
      <encoding>UTF-8</encoding>
    </configuration>
    <executions> 
      <execution> 
        <id>integration-test</id> 
        <goals> 
          <goal>integration-test</goal>
          <goal>verify</goal> 
        </goals> 
      </execution> 
    </executions> 
  </plugin>

4.2 config build-helper plugin

Add build-helper plugin to <build>.

  <plugin>
    <groupId>org.codehaus.mojo</groupId>
    <artifactId>build-helper-maven-plugin</artifactId>
    <version>1.9.1</version>
    <executions>
      <execution>
        <id>add-test-source</id>
        <goals>
          <goal>add-test-source</goal>
        </goals>
        <configuration>
          <sources>
            <source>${project.basedir}\src\integration\java</source>
          </sources>
        </configuration>
      </execution>
      <execution>
        <id>add-test-resource</id>
        <goals>
          <goal>add-test-resource</goal>
        </goals>
        <configuration>
          <resources>
            <resource>
              <!-- Don't forget <directory> label -->
              <directory>${project.basedir}\src\integration\resources</directory>
            </resource>
          </resources>
        </configuration>
      </execution>
    </executions>
  </plugin>

Now maven should also be happy with separated integration tests. Run command

mvn test

The unit test cases are invoked.

image

You can also just run integration test cases without packaging  or running unit tests . (For example when you are writing integration test cases).

mvn clean test-compile failsafe:integration-test

You can also run both unit test cases and integration test cases with command.

mvn verify

4.3 Errors may occure in Eclipse

After adding plugin 'build-helper', Eclipse may report errors complain about "execution not covered", just following the autofix from Eclipse.

image

This will add Eclipse's maven lifecycle mapping configuration, which stored in file <Eclipse workspace>/.metadata/.plugins/org.eclipse.m2e.core/lifecycle-mapping-metadata.xml

You can empty this file to undo your change later.

Happy testing!

Wednesday, February 3, 2016

Improve content assist for xml in Eclipse

The default configuration for xml content assist doen't feel very convenient for real usage.When you change you maven pom.xml or maybe the spring xml-style config files, the eclipse doesn't give you much help automatically. To get assist you need to keep pressing Ctrl+Space.

Here is a simple tip to improve the user experience for editing XML files, by making auto-trigger for assist more often. Window->preferences, set

<=:. _abcdefghijklmnopqrstuvwxyz like below. (There's a space among this string, before '_').

image

This can help you work more smoothly with XML files in Eclipse.

Wednesday, January 27, 2016

Optimize static import assist in Eclipse

In order to make eclipse can auto-import Static methods, we need to make a little config in Eclipse. This article shows how to make the config in Eclipse to make auto-import for static methos works. Also this article list some classes you may need to set in Eclipse useful for your real projects.

1. How to setup content assist for static import in Eclipse

For example, although JUnit is in the classpath, by default eclipse can not give any help to import static method like assertEqual, which is a static method of class org.junit.Assert, see the screenshot below:

image

To make content assist works for static methods in Eclipse, you need to add the class which contain this static method to Eclipse, which in this demo is class org.junit.Assert.  First open menu "Windows ->  Preference".

image

image

Then, from left, find "Java -> Editor -> Content Assist -> Favorites". The word "Type" on the right may be misleading. it actually means the class that contain the static method.

image

Click Ok until finish. Now press "ctrl + 1", the content assist can give you helpful import suggestions like below:

image

2. Some useful classes for static import

Besides the org.junit.Assert in the previous example, here are more you may need in real development.

JUnit
  • org.junit.Assert
hamcrest
  • org.hamcrest.MatcherAssert
  • org.hamcrest.Matchers
Mockito
  • org.mockito.Mockito
PowerMock
  • org.powermock.reflect.Whitebox
Spring MVC test
  • org.springframework.test.web.servlet.request.MockMvcRequestBuilders
  • org.springframework.test.web.servlet.result.MockMvcResultHandlers
  • org.springframework.test.web.servlet.result.MockMvcResultMatchers
  • org.springframework.test.web.servlet.setup.MockMvcBuilders

Tuesday, December 1, 2015

Remote Debug in Eclipse

Remote debug a Java application means the application run on a different VM rather than the one used for Eclipse. The Java application can run on the same host of you Eclipse as a separate process or on remote host.

In practical remote debug happens when there are some external environments in production that you don't have in your development environment. Or you code works in development environment, but has problems in production environment.

Remote debug can let you connect to the running applications and do what you can do for debug, like breakpoint/single-step-run/watch variables, just like debug a local application.

To make remote debug possible, extra JVM options have to be set when running the application remotely.

In this article, we create a hello world Java application, run it with command line, then use Eclipse to connect to it. In fact this hello world application can run on any remote host, but for demo it will run on the same host as where Eclipse is.

1. Create Project in Eclipse

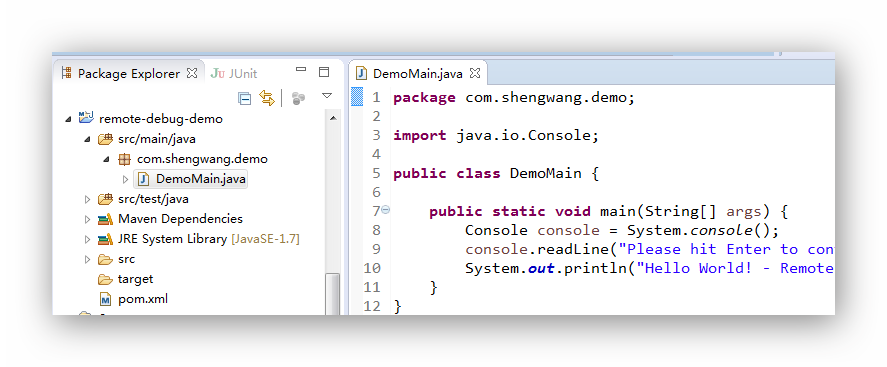
Create a Java project in Eclipse with a main class.

package com.shengwang.demo;

import java.io.Console;

public class DemoMain {

public static void main(String[] args) {
Console console = System.console();
console.readLine("Please hit Enter to continue...");
System.out.println("Hello World! - Remote Debug in Eclipse");
}
}

The demo project only has only 1 DemoMain.java.


image


Compile the project and it's ready to run. In your case this step means you finish your project's coding in Eclipse.


2. Run with extra JVM options


To enable remote debug, application has to be run with extra JVM options.


-Xdebug -Xrunjdwp:server=y,transport=dt_socket,suspend=n,address=0.0.0.0:8000


JDWP is the agent for debug and it will listen on port 8000, which is the default debug port in most case.


image


3.  Run Debug in Eclipse


Now the application is running, let's remotely debug it.


First select you project in Eclipse's package explorer. (make it easy to create debug configuration)


image


Then  click "Run-> Debug Configurations" from menu. Double-click "Remote Java Application" to create a debug configuration for the selected project.


image


Make sure the host and port is where you application runs and debug server specified port.  Then hit "Debug" to connect to the remote debug application. Almost done, you can debug the remote like you usually do. Let's set a break point on our source code.


image


Go back to our running application and hit enter to let it continue, the break point get hit and eclipse automatically switch Debug Perspective like local debugging.


image

Monday, November 23, 2015

How to setup a maven JEE project in Eclipse

Let's suppose you are new to JEE programming. After reading oracle official JEE tutorial document for a few days, you decide to get your hands wet.  You  download and install a JEE container, GlassFish 4 in this tutorial,  to your PC. You have JDK,maven and Eclipse all ready. So, what's next?

This demo shows you how to create maven project in Eclipse that can automatically deploy to a local GlassFish server. 

0. What you need

  • JDK 7+
  • Glassfish 4.0
  • Maven
  • Eclipse Java EE IDE (Luna 4.4.2 used in this demo)

1. Create a Empty Maven project in Eclipse

image

image

Since the demo is about servlet, so choose webapp archetype. For EJB you can choose the most simple one "maven-archetype-quickstart". The click  next until finish.

2. Modify pom.xml

Modify pom file for 4 reasons.

  • Change default package from "jar" to "war"
  • Add JEE dependency
  • Change default Java version to 1.7 
  • Configure Cargo plugin so we can use maven command-line to deploy you JEE package to server
<project xmlns="http://maven.apache.org/POM/4.0.0" xmlns:xsi="http://www.w3.org/2001/XMLSchema-instance"
xsi:schemaLocation="http://maven.apache.org/POM/4.0.0 http://maven.apache.org/maven-v4_0_0.xsd">
<modelVersion>4.0.0</modelVersion>
<groupId>com.shengwang.demo</groupId>
<artifactId>jee-servlet-demo</artifactId>
<packaging>war</packaging>
<version>1.0</version>
<name>jee-servlet-demo Maven Webapp</name>
<url>http://maven.apache.org</url>

<properties>
<project.build.sourceEncoding>UTF-8</project.build.sourceEncoding>
<!-- This is where I have my glassfish installed -->
<glassfish.home>D:\glassfish4.0</glassfish.home>
</properties>

<dependencies>
<!-- JEE dependency -->
<dependency>
<groupId>javax</groupId>
<artifactId>javaee-api</artifactId>
<version>7.0</version>
</dependency>
</dependencies>

<build>
<finalName>jee-servlet-demo</finalName>

<!-- Use Java 1.7 -->
<plugins>
<plugin>
<groupId>org.apache.maven.plugins</groupId>
<artifactId>maven-compiler-plugin</artifactId>
<version>2.5.1</version>
<configuration>
<source>1.7</source>
<target>1.7</target>
</configuration>
</plugin>

<!-- config cargo use local installed Glassfish -->
<plugin>
<groupId>org.codehaus.cargo</groupId>
<artifactId>cargo-maven2-plugin</artifactId>
<inherited>true</inherited>
<configuration>
<container>
<containerId>glassfish4x</containerId>
<type>installed</type>
<home>${glassfish.home}</home>
</container>
<configuration>
<type>existing</type>
<home>${glassfish.home}/glassfish/domains</home>
</configuration>
</configuration>
</plugin>

</plugins>
</build>
</project>

3. Change Servlet version


The just created project may have error about servlet version, since the archetype in Eclipse is not actively maintained. The project is still using servlet version 2.3.  There's also a bug in Eclipse that you can't change the version, You can only disable the Dynamic Web Module facets and set it again.


Right click on project name, and choose "Project Facets", then unselect Dynamic Web Module first.


image


Uncheck the Dynamic Web Module, click OK to finish.  Then open project facets again, set it back.


image


4. Set JEE application related config 


In this demo, servlet need a web.xml for deploy. If writing a EJB has persistence, then you may need a JPA config file persistence.xml.

<web-app xmlns="http://java.sun.com/xml/ns/javaee"
xmlns:xsi="http://www.w3.org/2001/XMLSchema-instance"
xsi:schemaLocation="http://java.sun.com/xml/ns/javaee
http://java.sun.com/xml/ns/javaee/web-app_3_0.xsd"
version="3.0">

<display-name>Demo for jee servlet hello world config</display-name>

</web-app>

The web.xml for this JEE servlet is almost empty. There is no <servlet> and <servlet-mapping> for normal servlet container (like tomcat) deployment. Because JEE server can automatic register servlets with annotation @WebServlet


5. Define Java class


We has only one class to write, HelloServlet.java. If the src/main/java directory not exists, create it by hand.

package com.shengwang.demo;

import java.io.IOException;
import java.io.PrintWriter;
import javax.servlet.ServletException;
import javax.servlet.annotation.WebServlet;
import javax.servlet.http.HttpServlet;
import javax.servlet.http.HttpServletRequest;
import javax.servlet.http.HttpServletResponse;


@WebServlet(name = "helloServlet", urlPatterns = { "/hello" })
public class HelloServlet extends HttpServlet {
private static final long serialVersionUID = 1L;

@Override
protected void doGet(HttpServletRequest req, HttpServletResponse resp) throws ServletException, IOException {
PrintWriter out = resp.getWriter();
out.printf("%s", "hello world from a JEE servlet");
out.flush();
}
}

This class use JEE annotation @WebServlet to provide http service at url localhost:8080/context_name/urlPattern . context_name is set in pom.xml by <finalName>, urlPattern is the urlPattern set in Java code. So for this demo the url is http://localhost:8080/jee-servlet-demo/hello


All done, now this 3-files project hierarchy looks like:


image


6. Run


Use maven command line to auto deploy our servlet to the local GlassFish server.

mvn clean verify cargo:run

The console output looks like below, the cargo maven plugin will start server and deploy automatically.


image


Now access our hello world level JEE servlet by browser.


image


Now if you open admin console of GlassFish, you can see our demo is correctly deployed. (Login required, default user is 'admin', default password is 'adminadmin' for cargo plugin)


image

Monday, September 14, 2015

How to setup Spring MVC project with maven in Eclipse

There article shows how to create a spring MVC project with maven in Eclipse. The eclipse comes with an internal maven-archetype-webapp for webapps, but is somehow a little bit out of date. The project created by that needs some extra work to make it workable.

In this demo a maven managed Spring MVC helloworld  webapp is created in Eclipse. This demo doesn’t try to show how to use Spring MVC, but focus on how to set up the development environment in Eclipse.

0. What you need

  • JDK 1.7 +
  • Eclipse IDE for Jave EE (version 4.4 Luna)
  • Maven 3.2.1

1. Create a maven project in Eclipse

Create a new maven project.

image

Make sure choose the archetype maven-archetype-webapp

image

Then next until finish. You may notice that the new created project has errors. In Eclipse IDE, it has red crosses like below.

image

Don’t worry about that, we will deal with the errors step by step until it becomes a runnable one.

2. Configure the project

There are several things need to be changed for the eclipse created project.

2.1 Configure maven pom.xml

Since this is a maven managed project, the JDK version need to be set in pom.xml, not in Eclipse. The dependency Spring MVC is also added to pom.xml

<project xmlns="http://maven.apache.org/POM/4.0.0" 
xmlns:xsi="http://www.w3.org/2001/XMLSchema-instance"
xsi:schemaLocation="http://maven.apache.org/POM/4.0.0
http://maven.apache.org/maven-v4_0_0.xsd">
<modelVersion>4.0.0</modelVersion>
<groupId>com.shengwang.demo</groupId>
<artifactId>spring-mvc-helloworld</artifactId>
<packaging>war</packaging>
<version>1.0</version>
<name>spring-mvc-helloworld Maven Webapp</name>
<url>http://maven.apache.org</url>

<dependencies>
<!-- Use Spring MVC -->
<dependency>
<groupId>org.springframework</groupId>
<artifactId>spring-webmvc</artifactId>
<version>4.1.6.RELEASE</version>
</dependency>
</dependencies>

<build>
<finalName>spring-mvc-helloworld</finalName>
<!-- Use Java 1.7 -->
<plugins>
<plugin>
<groupId>org.apache.maven.plugins</groupId>
<artifactId>maven-compiler-plugin</artifactId>
<version>2.5.1</version>
<configuration>
<source>1.7</source>
<target>1.7</target>
</configuration>
</plugin>
</plugins>
</build>
</project>

After pom.xml saved and use Alt-F5 to update the maven project, Eclipse still complain about an error for the project like below.


It’s a error about “javax.servlet.http.HttpServlet” was not found on the Java Build Path.


image


Don’t worry, The class should be provided by the Servlet containers, such as Tomcat, we need to do more configuration for the running environment of the project. So let deal with it now.


2.2 Configure Dynamic Web Module for project


It’s a little bit tricky to change Dynamic Web Module version in Eclipse, first you need to unset the default old version 2.3 in project facets, then set it again with new version 3.0 or higher. Direct change the version number will cause an error in Eclipse like this.


image


So let do it in the correct way, unset the old one, then set it again with new version.


Right click on the project name – > choose properties. Uncheck the Dynamic Web Module 2.3, then hit OK to confirm.


image


Again, right click on the project name – > choose properties. Check the Dynamic Web Module 3.0, Also set specify a runtime server for the our helloworld webapp.


image


Now our helloworld Spring MVC web app don’t have any errors in Eclipse.


image


2.3 Add java directory


The wizard created project don’t have directory for java code, we need to create this directory by hand. Like other maven project,  /src/main/java is the folder need to be created to put the java code.

Now if you continue to proceed this tutorial, configure web.xml and dispatcher-servlet.xml, you will end up with a spring mvc project with configuration in XML file. If you prefer to have a spring mvc project with java-based configuration, you can skip the rest of this article and jump to another tuorial on Java-based Spring mvc configuration - without Spring security


2.4  basic web.xml configuration


Change the default /src/main/webapp/WEB-INF/web.xml to the basic configuration below .

<web-app xmlns="http://java.sun.com/xml/ns/javaee" 
xmlns:xsi="http://www.w3.org/2001/XMLSchema-instance"
xsi:schemaLocation="http://java.sun.com/xml/ns/javaee
http://java.sun.com/xml/ns/javaee/web-app_3_0.xsd"
version="3.0">

<display-name>Demo for mvc hello world config</display-name>

<servlet>
<servlet-name>dispatcher</servlet-name>
<servlet-class>org.springframework.web.servlet.DispatcherServlet</servlet-class>
<!-- specify location of spring config, don't use default --> <init-param> <param-name>contextConfigLocation</param-name> <param-value>classpath:dispatcher-servlet.xml</param-value> </init-param> <load-on-startup>1</load-on-startup>
</servlet>
<servlet-mapping>
<servlet-name>dispatcher</servlet-name>
<url-pattern>/</url-pattern>
</servlet-mapping>

</web-app>

The version="3.0" means using servlet version 3.0. the Spring configuration file is name "dispatcher-servlet.xml" in classpath, usually means /src/main/resources/dispatcher-servlet.xml. Just remember don't use the default value for contextconfigLocation, which will be /src/main/webapp/WEB-INF by default, to avoid hitting rocks when doing integration test later.


2.5 basic spring configuration


Add a new file /src/main/resources/dispatcher-servlet.xml. In the same directory as web.xml, the basic spring configuration looks like below.

<?xml version="1.0" encoding="UTF-8"?>
<beans xmlns="http://www.springframework.org/schema/beans"
xmlns:xsi="http://www.w3.org/2001/XMLSchema-instance"
xmlns:beans="http://www.springframework.org/schema/beans"
xmlns:context="http://www.springframework.org/schema/context"
xmlns:mvc="http://www.springframework.org/schema/mvc"
xsi:schemaLocation="
http://www.springframework.org/schema/beans
http://www.springframework.org/schema/beans/spring-beans.xsd
http://www.springframework.org/schema/context
http://www.springframework.org/schema/context/spring-context.xsd
http://www.springframework.org/schema/mvc
http://www.springframework.org/schema/mvc/spring-mvc.xsd">

<context:component-scan base-package="com.shengwang.demo" />

<mvc:annotation-driven/>

<!-- ================================== -->
<!-- 1. mapping static resources -->
<!-- ================================== -->
<mvc:resources location="/static-resources/css/" mapping="/css/**" cache-period="3600"/>
<mvc:resources location="/static-resources/img/" mapping="/img/**" cache-period="3600"/>
<mvc:resources location="/static-resources/js/" mapping="/js/**" cache-period="3600"/>


<!-- ================================== -->
<!-- 2. view resolver for JSP -->
<!-- ================================== -->
<bean id="viewResolver"
class="org.springframework.web.servlet.view.InternalResourceViewResolver">
<property name="prefix" value="/WEB-INF/"/>
<property name="suffix" value=".jsp"/>
</bean>
</beans>

Change the base package to your own. In this demo it’s com.shengwang.demo. The static resources directory can be any directories relative to /src/main/webapp


Now the project looks like this.

image

Since this article focuses on how to setup project and development environment for spring mvc with maven in Eclipse. The spring mvc coding part, such controllers and business logic are omitted. Now your maven managed Spring MVC project is setup in Eclipse, ready for some java code and run.


Happy coding!

Tuesday, December 9, 2014

How to create Java classes from existing tables in database for JPA

If JPA is your persistence layer in your project and you have tables already defined in database. You can use JPA tools in Eclipse to automatically create corresponding Java Entity classes from those tables in database.

In this article, Java JPA entities will be created from an oracle database on LAN.

1. what you need

  • Eclipse 4.3 +  ( In this article, Eclipse Java EE version 4.3.2 kepler is used )
  • Database connection configuration in Eclipse. In eclipse, configure a database connection to the oracle database.  If you don't know how to do that, read this article first How to add oracle DB connection in Eclipse.

2. Make sure you have JPA support enabled in your projects

Righ click on the project name and select "Properties"

Snap_2014.12.09 14.30.34_003

Use project facets if project facets not enabled

Snap_2014.12.09 10.02.48_001

Click the "JPA" if it's not selected, then click "OK" to close the project properties window.

Snap_2014.12.09 14.34.20_004

3. create Java classes from tables

After enabling JPA in project properties, now right click you eclipse project name again, you should see a new context menu item "JPA tools" appears. Choose "Generate Entities from tables"

If you see the "JPA tools" menu but the sub menu don't have "Generate Entities from tables"  item, make sure you right click on the project name instead of a package or a class file.

Snap_2014.12.09 14.49.33_006 

Select a database connection to let Eclipse get the tables  used to generated class from.  (See another tutorial on  how to configure a database connection in Eclipse)

Snap_2014.12.09 15.04.08_007

After connected to the database, schema and tables will be listed below, choose the tables you need in your Java project and click "Next"Snap_2014.12.09 15.07.21_008

In this tutorial  2 tables are selected. There is a  foreign key between 2 tables. Logically one  platform can have more than one devices. It's a "1 to many" mapping.

Next Eclipse automatically create associations between tables you select.  Click each association to see the details.

Snap_2014.12.09 15.20.46_009

In the final step, Eclipse offers the chance to change generated Java class name and the field name inside the generated java class.

Snap_2014.12.09 15.28.13_011

Snap_2014.12.09 15.29.02_012

Click "finish" and the Java classes will be created.  For example one of the Entity class created looks like:

Snap_2014.12.09 15.38.05_013

The created Java Entity class is well annotated and ready for use!

Powered by Blogger.

About The Author

My Photo
Has been a senior software developer, project manager for 10+ years. Dedicate himself to Alcatel-Lucent and China Telecom for delivering software solutions.

Pages

Unordered List