Showing posts with label maven. Show all posts

Saturday, December 22, 2018

Several useful cases for maven plugin “dependency”

The maven dependency plugin is very handy when trying to deal with following questions:

  • What are the external artifacts involved in a maven project. (dependency:resolve)
  • Find out how an artifact is introduced into a project. (dependency:tree)
  • In a multi modules project, how these modules denpend on each other? (dependency:tree –Dincludes=com.mypackage.*)
  • Find out unnecessary dependencies in a maven project. (dependency:analyze)


To solve these puzzles, we need to know some typical usage of maven dependency plugin.

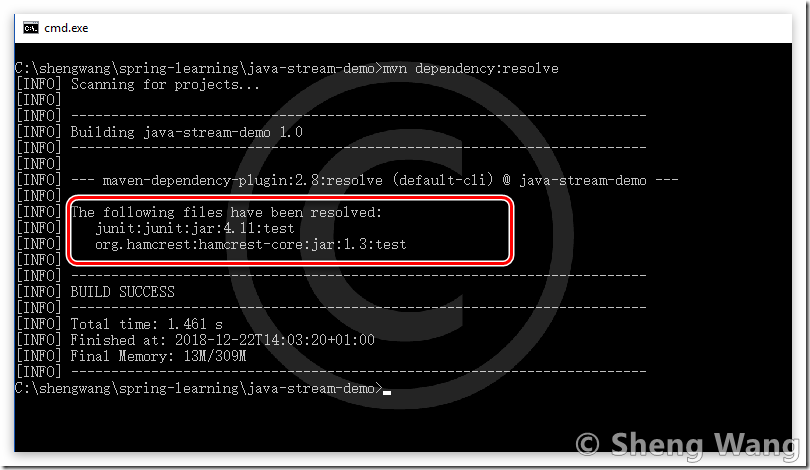
1. goal ‘resolve’

#list all dependencis
mvn dependency:resolve 

Output looks like below.

image

2. goal ‘tree’

# list dependencies tree. 
# can use –Dincludes=[groupId]:[artifactId]:[type]:[version], can use wildcard *

# e.g  -Dincludes=org.springframework*,org.apache*    # list only package from spring and apache.

mvn dependency:tree  -Dincludes=org.springframework*

Output looks like below.

image


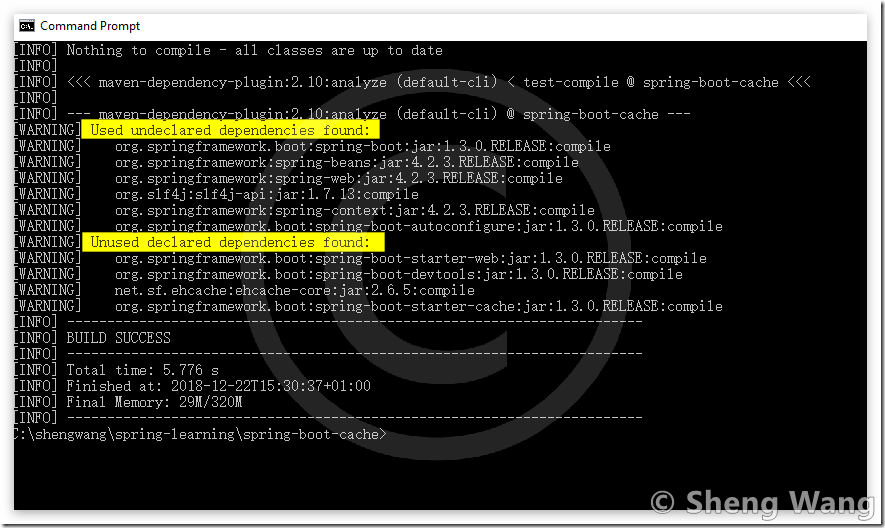
3. goal ‘analyze’

# List possible inmproper dependency. 
# 1.avoid ‘Used undeclared dependencies`
# 2.'Unused declared dependencies` are not 100% reliable, cause of <provide> or <optional>
#    need to check manually

mvn dependency:analyze

Output looks like below.

image

In above screenshot there are several suspicious dependencis may not be used at all. Then use “dependency:tree –Dincludes= org.springframework.boot:spring-boot-starter-web” to see how this dependency is introduced to the project.

Thursday, April 7, 2016

How to dump all dependencies of a maven project

Although it's not common but it really happens in real life.  Usually maven  already automatically downloads all dependencies to local repository, and for some reason you want to get some or all  dependency jar files of this project.  For example you final package is a executable jar but not a "contain-all" uber executable jar. You only need to deploy these dependencies jars once on running host.  This make building process much faster than create a uber executable jar by shade plugin.

Run following command in project home directory (pom.xml in the current direcotry)

mvn dependency:copy-dependencies

Now you will find all dependency jar files get copied to directory target/dependency, like the following snapshot.

image

Wednesday, April 6, 2016

Understand <optional>true</optional> in maven dependency

In pom's dependency , sometimes there's  <optional> true</option>. What does this mean? Why and when do you need to set this?

1. Meaning of <optional>

In short, if project D depend on project C, Project C optionally depend on project A, then project D do NOT depend on project A.

image

Since project C has 2 classes use some classes from project A and project B. Project C can not get compiled without dependencies on A and B. But these two classes are only optional features, which may not be used at all in project D, which depend on project C. So to make the final war/ejb package don't contain unnecessary dependencies, use <optional> to indicate the dependency is optional, be default will not be inherited by others.

What happens if project D really used OptionaFeatureOne in project C? Then in project D's pom, project A need to be explicitly declared in the dependencies section.

image

If optional feature one is used in project D, then project D's pom need to declare dependency on project A to pass compile. Also, the final war package of project D doesn't contain any class from project B, since feature 2 is now used.

2. Practical example

A practical example of using <optional> label is spring-boot-actuator. For example in spring-boot-actuator 1.3.3 release pom file, there are 20+ dependencies are optional, cause sprint-boot don't want to squeeze unnecessary jars into your final war package. Any project uses spring boot actuator will not have these 20+ jars in the final package by default. But if you do have want used some features, e.g. add a Timer metrics to meature the TPS of your web app, then you need to explicitely add dependency to metrics again.

image

Wednesday, March 2, 2016

How to separate integration test from unit test

0. Environment

  • Maven  3.2 +
  • Eclipse
  • JUnit 4.+

This article supposes you already know how to use maven plugin failsafe for integration test.

1. Final goal

Let's clarify the word "separate" first. It means:

  • Unit tests and integration tests are in different directories, but stay in the same maven project (not in another maven module project).

Also we want achieve these goals:

  • In Eclipse, you can choose to only run unit tests alone,  without integration tests
  • In Eclipse, you can choose to only run integration tests alone,  without unit tests
  • In maven command line, you can choose to only run unit tests alone,  without integration tests (mvn test)
  • In maven command line, you can choose to only run integration tests alone,  without unit tests (mvn clean test-compile failsafe:integration-test)
  • In maven command line, you can also run them both with a single command. (mvn verify)

The final directory hierrarchy looks like below.

image

The project hierrarchy in Eclipse looks like below.

image

Just remember Eclipse and Maven have different ways to manage build process, so both Eclipse and Maven pom file need to be configured respectively.

2. Create directories for integration test

Create 2 directories in your project

  • src/integration/java
  • src/integration/resources

3. Configure in Eclipse

3.1 add source folder

In Eclipse, right click you project's name -> new -> Source Folder.  ( Not folder, but Source Folder)

image

The click button  "Brower" for Folder name.

 image

Select /src/integration/java, then OK, to add this directory to Eclipse build path.

image

Now you should see a new source folder added to you project in Eclipse.

image

Repeat to add another source folder /src/integration/resources. Now you project in Eclipse should looks like below.

image

3.2 Config Eclipse build path

Since integration tests are also tests, you don't want them mixed with main code. So you need to change the "Build Path" in Eclipse. By default, newly added source folders are treated as main code/resources.

Right click project name -> Build Path -> Configure Build Path

image

Change Output folder for both /src/integration/java and /src/integration/resources to target/test-classes

image

Up to now, you should be about to run unit test and integration tests separately, by choose different dir to run.

4. Configure pom.xml

By default, maven can only have 1 test source directory, which point to ${project.basedir}/src/test/java. To add our newly created dir to maven as test source/resource, we need to utilize plugin 'build-helper'.

4.1 config failsafe plugin

Add failsafe plugin in <build>

  <plugin>
    <groupId>org.apache.maven.plugins</groupId>
    <artifactId>maven-failsafe-plugin</artifactId>
    <version>2.19.1</version>
    <configuration>
      <encoding>UTF-8</encoding>
    </configuration>
    <executions> 
      <execution> 
        <id>integration-test</id> 
        <goals> 
          <goal>integration-test</goal>
          <goal>verify</goal> 
        </goals> 
      </execution> 
    </executions> 
  </plugin>

4.2 config build-helper plugin

Add build-helper plugin to <build>.

  <plugin>
    <groupId>org.codehaus.mojo</groupId>
    <artifactId>build-helper-maven-plugin</artifactId>
    <version>1.9.1</version>
    <executions>
      <execution>
        <id>add-test-source</id>
        <goals>
          <goal>add-test-source</goal>
        </goals>
        <configuration>
          <sources>
            <source>${project.basedir}\src\integration\java</source>
          </sources>
        </configuration>
      </execution>
      <execution>
        <id>add-test-resource</id>
        <goals>
          <goal>add-test-resource</goal>
        </goals>
        <configuration>
          <resources>
            <resource>
              <!-- Don't forget <directory> label -->
              <directory>${project.basedir}\src\integration\resources</directory>
            </resource>
          </resources>
        </configuration>
      </execution>
    </executions>
  </plugin>

Now maven should also be happy with separated integration tests. Run command

mvn test

The unit test cases are invoked.

image

You can also just run integration test cases without packaging  or running unit tests . (For example when you are writing integration test cases).

mvn clean test-compile failsafe:integration-test

You can also run both unit test cases and integration test cases with command.

mvn verify

4.3 Errors may occure in Eclipse

After adding plugin 'build-helper', Eclipse may report errors complain about "execution not covered", just following the autofix from Eclipse.

image

This will add Eclipse's maven lifecycle mapping configuration, which stored in file <Eclipse workspace>/.metadata/.plugins/org.eclipse.m2e.core/lifecycle-mapping-metadata.xml

You can empty this file to undo your change later.

Happy testing!

Friday, February 26, 2016

Play with spring integration test

This article is mainly about using spring-test for integration test. Some basic issuses of integration test are discussed for projects with following natures:

  • It's a maven project
  • It's also a Spring webmvc proejct
  • It's developed in Eclipse.

This article is based on Spring framework 4.2 +

0. Basics

0.1  Unit test and  integration test

Test target of unit test is every individual POJO, if this target object need other external objects, mock them. In a spring web/rest application, unit tests run without Spring context.  JUnit test runner usually sets to someone from mock framework.  such as @RunWith(MockitoJUnitRunner.class) if Mockito is used.

From "unit test"'s view, it doesn't matter if you application is a Spring mvc application. It even doesn't matter if you application uses spring or not. Because unit tests only verify a bunch of  classes one by one, decouple them with the help of mock.

Test target of integration test is functions of a group of components. In a spring web/rest application, spring-test provide Spring TestContext Frame to simulate a servlet container, so your code can run in a web context without  deployment to a real server. JUnit test runner usually sets to the one provided by spring-test, like @RunWith(SpringJUnit4ClassRunner.class) 

0.2 JUnit, Running test in eclipse, Running test by maven

JUnit is just a test framework, it has no idea of the currently running test is a "unit test" or an "integration test".  Or we can say, a JUnit test case can be a unit test, it can also be a integration test.

Eclipse has no concept of integration test but only unit test. Eclipse has no requirement about test case class names.  e.g a class named "BookRestControllerAbc.java" can run as a JUnit test.

Maven uses plugin "surefire" to run "unit test", use plugin "failsafe" to run "integration" test.  They have decidedly naming conventions.

Surefire plugin by default will automatically run test cases with following names:

  • "**/Test*.java"
  • "**/*Test.java"
  • "**/*TestCase.java"

Failsafe plugin by default will automatically run test cases with following names:

  • "**/IT*.java"
  • "**/*IT.java"
  • "**/*ITCase.java"

So the test cases can be categoried by their class names.

0.3 Watch out dir /src/main/webapp

Even it's a maven project in eclipse, eclipse and maven have their own way to manage dependencies and resources. This is the key to understand the problems like "Why I can run my test case in eclipse but will can't run the same test in maven build?" or the reverse one,  "Why  I can my test case with maven but can't run it in Eclipse". Usually the cause of these kinds of problems seem like can't find some resources in a certain senario.

Here is the dilemma:

In Eclipse, create a maven web application will create directory /src/main/webapp as web root.

web.xml must in directory /src/main/webapp/WEB-INF. The default spring configuration, either applicationContext.xml or dispatcher-servlet.xml  required by Spring webmvc need to be in the same directory /src/main/webapp/WEB-INF.

But by default /src/main/webapp is NOT a resource directory for both maven and Eclipse.

You can succeed in "Run on Server" in Eclipse, because web root /src/main/webapp also get packaged with the help of package behavior for war in Eclipse.

But for integration tests, they will definitly fail no matter using maven or in Eclipse.   Since neither applicationContext.xml nor dispatcher-servlet.xml  in web/main/webapp are recognized as resources. The error message will be some kind of file not found.

If you simply move, e.g dispatcher-servlet.xml from /src/main/webapp/WEB-INF/ to maven's resource path like /src/main/resources/WEB-INF/,  the application can no longer run in Eclipse.  The error message will complain can not find /WEB-INF/dispatcher-servlet.xml or similar.

So here's the best way in my experience:

  1. Move spring configuration applicationContext.xml or dispatcher-servlet.xml to maven resources path /main/resources
  2. In web.xml, set context location for servlet dispatcher like below
  <servlet>
    <servlet-name>dispatcher</servlet-name>
    <servlet-class>org.springframework.web.servlet.DispatcherServlet</servlet-class>
 
    <!--  specify location of spring config, don't use default -->
    <init-param>
      <param-name>contextConfigLocation</param-name>
      <param-value>classpath:dispatcher-servlet.xml</param-value>
    </init-param>
    
    <load-on-startup>1</load-on-startup>
  </servlet>

The final project hierarchy like below.

image


Since resources are now in the path recognized by both Maven and Eclipse, we can successfully run our web application in Eclipse as well as run integration test in maven command line or in Eclipse.

This probably make you stop using xml-styled spring configuration and embrace the Java-styled spring configuration for the sake of a easier life.

1. Config pom.xml for integration test

Maven has failsafe plugin for integration test.

<plugin>
  <groupId>org.apache.maven.plugins</groupId>
  <artifactId>maven-failsafe-plugin</artifactId>
  <version>2.19.1</version>
  <configuration>
    <encoding>UTF-8</encoding>
  </configuration>
  <!-- uncomment to bind maven lifecycle
  <executions> 
    <execution> 
      <id>integration-test</id> 
      <goals> 
        <goal>integration-test</goal>
        <goal>verify</goal> 
      </goals> 
    </execution> 
  </executions> 
  -->
</plugin>

Without bind to any lifecycle like above, you can run integration test with command

mvn failsafe:integration-test

2. Spring integration test case with JUnit

Cheat sheet for creating Spring integration test with JUnit.

  1. Set JUnit runner @RunWith(SpringJUnit4ClassRunner.class)
  2. Load spring config with @WebAppConfiguration and @ContextConfiguration("classpath:dispatcher-servlet.xml")
  3. @Autowire WebApplicationContext wac in JUnit test case class.
  4. Create MockMvc in JUnit's @Before method, mockMvc = MockMvcBuilders.webAppContextSetup(wac).build();
  5. In test case method, use MockMvc.perform(MockMvcRequestBuilders.xxx()) to send request and andExpect(MockMvcResultMatchers.yyy) to verify response.

3. possible issues

3.1 javax.servlet.ServletContext  Not Found

This error message often happens when running integration test with plugin failsafe. You may see an error message like below.

Failed to instantiate [org.springframework.test.context.web.WebDelegatingSmartContextLoader]: Constructor threw exception; nested exception is java.lang.NoClassDefFoundError: javax/servlet/ServletContext

Add the following dependency can solve the problem.

  <dependency>
    <groupId>javax.servlet</groupId>
    <artifactId>javax.servlet-api</artifactId>
    <version>3.0.1</version>
    <scope>provided</scope>
  </dependency>

Make sure the major version (3.0) should be same as specified in web.xml.

3.2 Could not obtain DataSource when using @Sql + JPA

When testing, you probably like to use memory database such as HSQL, H2 or Derby.  If all the connection configurations. e.g driver, url, username and password, are in JPA /META-INF/persistence.xml file, not in spring's configuration, you may see an error like below complain couldn't obtain DataSource from transaction manager when using @Sql to insert test data before a certain test case.

java.lang.IllegalStateException: Failed to execute SQL scripts for test context ..(some text ignored).. could not obtain DataSource from transaction manager [org.springframework.orm.jpa.JpaTransactionManager] (named '').

This because the @Sql need DataSource in spring context, just add a DataSource in your spring configuration. Make sure the this datasource point to the same database as  in the persistence.xml. For example, if the persistence.xml using a H2 database like below,

<?xml version="1.0" encoding="UTF-8"?>
<persistence version="2.1"
 xmlns="http://xmlns.jcp.org/xml/ns/persistence" xmlns:xsi="http://www.w3.org/2001/XMLSchema-instance"
 xsi:schemaLocation="http://xmlns.jcp.org/xml/ns/persistence http://xmlns.jcp.org/xml/ns/persistence/persistence_2_1.xsd">
 <persistence-unit name="spring-persistence-jpa-tx" transaction-type="RESOURCE_LOCAL">
  <provider>org.hibernate.ejb.HibernatePersistence</provider>
  <exclude-unlisted-classes>false</exclude-unlisted-classes>
  <properties>
  
   <property name="javax.persistence.jdbc.driver" value="org.h2.Driver" />
   <property name="javax.persistence.jdbc.url" value="jdbc:h2:mem:mydb" />
   <property name="javax.persistence.jdbc.user" value="sa" />
   <property name="javax.persistence.jdbc.password" value="" />
   
   <!-- Automatically drop then create table -->
   <property name="hibernate.hbm2ddl.auto" value="create" />
   <!-- print out sql  -->
   <property name="hibernate.show_sql" value="true"/>
  </properties>
 </persistence-unit>
</persistence>

Then we need to add a DataSource bean in Spring configure to be able to use @Sql annotation. In xml-styled configuration, with spring-jdbc's help, it's easy to create a datasource using embedded database.

<?xml version="1.0" encoding="UTF-8"?>
<beans xmlns="http://www.springframework.org/schema/beans"
  xmlns:xsi="http://www.w3.org/2001/XMLSchema-instance" xmlns:beans="http://www.springframework.org/schema/beans"
  xmlns:jdbc="http://www.springframework.org/schema/jdbc"
  xsi:schemaLocation="
    http://www.springframework.org/schema/jdbc
    http://www.springframework.org/schema/jdbc/spring-jdbc.xsd">

  <!--  omit other beans  -->
  
  <jdbc:embedded-database id="usually_is_dataSource" type="H2" database-name="mydb">
    <!-- 
    <jdbc:script location="classpath:anyfile1.sql"/>
    <jdbc:script location="classpath:anyfile2.sql"/>
     -->
  </jdbc:embedded-database>
</beans>

Notice if using the embedded memory, the database'name is important. The database-name MUST be same as what in persistence.xml. In  this demo it's 'mydb'.

4. A complete demo

In the end of the article,a demo of integration test for get resource of a REST web service is provided. It inerts test data before test running, then runs the junit test case try to access a url and check the status of the response is 200. Finally, restores the database by deleting the inserted test data.

package com.shengwang.demo.controller;

// import ignored

@RunWith(SpringJUnit4ClassRunner.class)
@WebAppConfiguration
@ContextConfiguration({"classpath:/WEB-INF/dispatcher-servlet.xml"})
public class BookRestControllerIT {
  @Autowired
  WebApplicationContext wac;
  private MockMvc mockMvc;

  @Before
  public void setUp() throws Exception {
    mockMvc = MockMvcBuilders.webAppContextSetup(wac).build();
  }

  @Test
//  @Sql(scripts="classpath:insertOneBook.sql")
  @SqlGroup ({
      @Sql(statements="insert into book (book_id,title) values (1,'Test title')"),
      @Sql(statements="delete from book where book_id=1",executionPhase=ExecutionPhase.AFTER_TEST_METHOD)
  })
  public void testFindBookWithExistBookId() {
    try {
      mockMvc.perform(get("/book/1")).andExpect(MockMvcResultMatchers.status().isOk());
    } catch (Exception e) {
      fail("testFindBookWithExistBookId failed");
    }
  }
}

It passes successfully in Eclipse.

image

It also passes in maven command line invocation. 

mvn clean test-compile failsafe:integration-test

5. More

Here provides a hello world level spring integration test case. In read usage, you should separate your unit test cases from integration test cases. That need more configuration in Eclipse (in Java Build Path) and in Maven pom.xml (with the help of plugin build-helper-maven-plugin) respectively. See another tutorial on "How to separate integration test from unit test"
Monday, February 1, 2016

Quick overview of Maven plugin configuration

This article tries to give a quick generic overview of Maven plugins. In the end a pluginin usage is given and explained, so you can get a feeling of how maven plugins look like as a whole.  plugins refer to maven plugins in the following context.

1. Plugin naming rules

The naming convention for official plugins is maven-<plugin name>-plugin. For example, maven-surefire-plugin

The recommand third-party and user-defined plugin should be named <plugin name>-maven-plugin.  For example the plugin for spring boot is named spring-boot-maven-plugin

2. Plugins type

Build plugins will be executed during the build and they should be configured in the <build/> element from the POM. 
Reporting plugins will be executed during the site generation and they should be configured in the <reporting/> element from the POM.

Build plugins  ( <build/>) are more common to see.

3. Available plugins list

Here is the complete availble plugins from official, you can also find a plugin is a build plugin or a report plugin or both on that page.

4. Plugin goal

A plugin goal represents a specific task (finer than a build phase) which contributes to the building and managing of a project. It may be bound to zero or more build phases.

If a goal is bound to one or more build phases, that goal will be called in all those phases automatically.  For example if a plugin has goal bound to phase 'package', then when run 'mvn package' that plugin's goal will be executed.

A goal not bound to any build phase could be executed outside of the build lifecycle by direct invocation.

#============================================================================
# Syntax for invoke a plugin's goal from command line:
# mvn <plugin name>:<goal> [-D<plugin name>.<property name>=<property value>]
#============================================================================
#For example, use 'exec' plugin, goal is 'java', set the plugin property of 'mainClass'
mvn exec:java -Dexec.mainClass="com.shengwang.demo.DemoMain"

All official plugins support a goal called 'help'. It has 2 properties 'detail' and 'goal'. See example below.

5. How to get available goals of a certain plugin.

  • Search keyword "maven <plugin name>  plugin" on google, jump to plugin's official web to learn how to use it. It's suitable for first time using a plugin.
  • In command line, run 'mvn <plugin name>:help', get all available goals. It's more convinient for experienced users for just missing some details.

For example here is the output of the 'mvn exec:help'

image

6. How to get more usage help from command line.

First run 'mvn <plugin name>:help' for all goals, then run 'mvn <plugin name>:help  -Ddetail=true -Dgoal=<goal>' for more usage details of a certain goal. You can try to run 'mvn exec:help -Dgoal=java -Ddetail=true' to see the output. (Don't forget the -D)

7. Basic configuration structure of plugins

For Build plugins, it's included in <build/>.  it has <executions/>, which is the real actiion that are intened to do during bounded build lifecycle.  Let's examine an example:

<build>
  <plugins>
  
    <!-- .... other plugins ...-->
  
    <!-- =========================================== -->
    <!-- make sure antrun is after packaging plugins -->
    <!-- =========================================== -->
    <plugin>
      <groupId>org.apache.maven.plugins</groupId>
      <artifactId>maven-antrun-plugin</artifactId>
      <version>1.8</version>
      <executions>
        <execution>
          <id>scp-to-remote</id>
          <phase>package</phase>
          <goals>
            <goal>run</goal>
          </goals>
          <configuration>
            <target>
              <!-- keyfile+passphrase or  password, choose one -->
              <!-- 
              <scp localFile="${project.basedir}/target/qos-spark-1.0.jar"
                remoteToFile="root@192.168.203.156:/usr/sanss" verbose="true"
                keyfile="C:\Users\shengw\.ssh\192.168.203.156\id_rsa"
                passphrase="">
              </scp>
               -->
              <scp localFile="${project.basedir}/target/qos-spark-1.0.jar"
                remoteToFile="root@192.168.203.156:/usr/sanss" verbose="true"
                password="passwordForSSH" trust="true">
              </scp>
            </target>
          </configuration>
        </execution>
      </executions>
      <!-- libraries for scp impl      -->
      <!-- antrun doesn't use os's scp -->
      <dependencies>
        <dependency>
          <groupId>com.jcraft</groupId>
          <artifactId>jsch</artifactId>
          <version>0.1.53</version>
        </dependency>
        <dependency>
          <groupId>ant</groupId>
          <artifactId>ant-jsch</artifactId>
          <version>1.6.5</version>
        </dependency>
      </dependencies>
    </plugin>
    <!-- =========================================== -->
    <!--   antrun plugin end                         -->
    <!-- =========================================== -->
  
  </plugins>
</build>

It's a long one, but no need to be panic. This example has the common configuration structure for maven plugins.  Most of the plugins' configuration are shorter.

It's included in <build/> because its a build plugin.

The first part of plugin configuration is trival:  <groupId>, <artifactId> and <version>.

Then there's one <execution> defined in above example. There are <id>, <phase>, <goal> and <configuration> in this <execution>. 

  • <id> - identify this execution. If more pom.xml  has the same plugin bound to same phase and has the same id, these <execution>  will be merged when building. Normally just give a meanful string for this execution.
  • <phase> - bind the execution to a build lifecycle. So it can get executed automatically at that build lifecycle. The above demo, executing antrun plugin when use 'mvn package'
  • <goal> - which behavior of this plugin to be used. In the example, the goal "run" will run some ant tasks. The tasks are defined in <configuration>.
  • <configuration> - Set property for the plugin. Normally any parameter in <configuration> has a corresponding field variable in the plugin class definition, just like a jave bean. For the <target> property, AntRunMojo.java from antrun plugin's source has the variable. Just treat the properties in <configuration> as setting values for these field variables.

image

If there are more <execution>, every one can has its own <configuration>. If <configuration> is out of <executions>, it's  for all <execution>.

Finally, <dependencies> in the <plugin>, to set external libraries only used for this plugin. Most plugins don't need to specify <dependencies> for plugin itself.

How to let maven copy(scp) created jar/war package to other location

In real development, you may found your development environment is different from the running environment. For example, like my own case,  I'm working on a Hadoop/Spark related project.  So I have all my source code and development environment like Eclipse/Maven setup on my Windows laptop, but maven created jar file has to be deployed to a linux  server in the lab with Spark installed. Maunally copy maven created jar file to remote server for every run is tedious, so I need to let maven automatically do the file upload when running command 'mvn package'.

The basic idea is to use a maven plugin called 'antrun', run a ant task at maven lifecycle 'package'. Ant has scp task to copy files locally or remotely.  By utilizing this scp task from ant, you can copy the created jar/war file to anywhere, such as to a different local directory or to a remote host.

The follow demo try to copy a jar file to a remote host.  All you need is to modify maven pom.xml file, add and config this antrun plugin.

1. pom.xml

<build>
  <plugins>
  
    <!-- .... other plugins ...-->
  
    <!-- =========================================== -->
    <!-- make sure antrun is after packaging plugins -->
    <!-- =========================================== -->
    <plugin>
      <groupId>org.apache.maven.plugins</groupId>
      <artifactId>maven-antrun-plugin</artifactId>
      <version>1.8</version>
      <executions>
        <execution>
          <id>scp-to-remote</id>
          <phase>package</phase>
          <goals>
            <goal>run</goal>
          </goals>
          <configuration>
            <target>
              <!-- keyfile+passphrase or  password, choose one -->
              <!-- 
              <scp localFile="${project.basedir}/target/qos-spark-1.0.jar"
                remoteToFile="root@192.168.203.156:/usr/sanss" verbose="true"
                keyfile="C:\Users\shengw\.ssh\192.168.203.156\id_rsa"
                passphrase="">
              </scp>
               -->
              <scp localFile="${project.basedir}/target/qos-spark-1.0.jar"
                remoteToFile="root@192.168.203.156:/usr/sanss" verbose="true"
                password="mypassword" trust="true">
              </scp>
            </target>
          </configuration>
        </execution>
      </executions>
      <!-- libraries for scp impl      -->
      <!-- antrun doesn't use os's scp -->
      <dependencies>
        <dependency>
          <groupId>com.jcraft</groupId>
          <artifactId>jsch</artifactId>
          <version>0.1.53</version>
        </dependency>
        <dependency>
          <groupId>ant</groupId>
          <artifactId>ant-jsch</artifactId>
          <version>1.6.5</version>
        </dependency>
      </dependencies>
    </plugin>
    <!-- =========================================== -->
    <!--   antrun plugin end                         -->
    <!-- =========================================== -->
  
  </plugins>
</build>

This looks long, but don't be panic. To use it you need to change some properties for <scp> part.

localFile is the src file, remoteToFile is the dest file. You also need to change the authentication information like where you private key file is by keyfile, if you use public/private key for authentication, or just set the password for ssh.

Also you can use antrun to copy created jar to other dir on local file system by replace remoteToFile to localToFile.

Also remember to put you antrun plugin after other package plugin to make sure the jar file is already created when reach antrun. It's safe to put it at the end of the plugin list.

Let's run 'mvn  package', the output looks like below.

image

2. See also

Monday, November 23, 2015

How to setup a maven JEE project in Eclipse

Let's suppose you are new to JEE programming. After reading oracle official JEE tutorial document for a few days, you decide to get your hands wet.  You  download and install a JEE container, GlassFish 4 in this tutorial,  to your PC. You have JDK,maven and Eclipse all ready. So, what's next?

This demo shows you how to create maven project in Eclipse that can automatically deploy to a local GlassFish server. 

0. What you need

  • JDK 7+
  • Glassfish 4.0
  • Maven
  • Eclipse Java EE IDE (Luna 4.4.2 used in this demo)

1. Create a Empty Maven project in Eclipse

image

image

Since the demo is about servlet, so choose webapp archetype. For EJB you can choose the most simple one "maven-archetype-quickstart". The click  next until finish.

2. Modify pom.xml

Modify pom file for 4 reasons.

  • Change default package from "jar" to "war"
  • Add JEE dependency
  • Change default Java version to 1.7 
  • Configure Cargo plugin so we can use maven command-line to deploy you JEE package to server
<project xmlns="http://maven.apache.org/POM/4.0.0" xmlns:xsi="http://www.w3.org/2001/XMLSchema-instance"
xsi:schemaLocation="http://maven.apache.org/POM/4.0.0 http://maven.apache.org/maven-v4_0_0.xsd">
<modelVersion>4.0.0</modelVersion>
<groupId>com.shengwang.demo</groupId>
<artifactId>jee-servlet-demo</artifactId>
<packaging>war</packaging>
<version>1.0</version>
<name>jee-servlet-demo Maven Webapp</name>
<url>http://maven.apache.org</url>

<properties>
<project.build.sourceEncoding>UTF-8</project.build.sourceEncoding>
<!-- This is where I have my glassfish installed -->
<glassfish.home>D:\glassfish4.0</glassfish.home>
</properties>

<dependencies>
<!-- JEE dependency -->
<dependency>
<groupId>javax</groupId>
<artifactId>javaee-api</artifactId>
<version>7.0</version>
</dependency>
</dependencies>

<build>
<finalName>jee-servlet-demo</finalName>

<!-- Use Java 1.7 -->
<plugins>
<plugin>
<groupId>org.apache.maven.plugins</groupId>
<artifactId>maven-compiler-plugin</artifactId>
<version>2.5.1</version>
<configuration>
<source>1.7</source>
<target>1.7</target>
</configuration>
</plugin>

<!-- config cargo use local installed Glassfish -->
<plugin>
<groupId>org.codehaus.cargo</groupId>
<artifactId>cargo-maven2-plugin</artifactId>
<inherited>true</inherited>
<configuration>
<container>
<containerId>glassfish4x</containerId>
<type>installed</type>
<home>${glassfish.home}</home>
</container>
<configuration>
<type>existing</type>
<home>${glassfish.home}/glassfish/domains</home>
</configuration>
</configuration>
</plugin>

</plugins>
</build>
</project>

3. Change Servlet version


The just created project may have error about servlet version, since the archetype in Eclipse is not actively maintained. The project is still using servlet version 2.3.  There's also a bug in Eclipse that you can't change the version, You can only disable the Dynamic Web Module facets and set it again.


Right click on project name, and choose "Project Facets", then unselect Dynamic Web Module first.


image


Uncheck the Dynamic Web Module, click OK to finish.  Then open project facets again, set it back.


image


4. Set JEE application related config 


In this demo, servlet need a web.xml for deploy. If writing a EJB has persistence, then you may need a JPA config file persistence.xml.

<web-app xmlns="http://java.sun.com/xml/ns/javaee"
xmlns:xsi="http://www.w3.org/2001/XMLSchema-instance"
xsi:schemaLocation="http://java.sun.com/xml/ns/javaee
http://java.sun.com/xml/ns/javaee/web-app_3_0.xsd"
version="3.0">

<display-name>Demo for jee servlet hello world config</display-name>

</web-app>

The web.xml for this JEE servlet is almost empty. There is no <servlet> and <servlet-mapping> for normal servlet container (like tomcat) deployment. Because JEE server can automatic register servlets with annotation @WebServlet


5. Define Java class


We has only one class to write, HelloServlet.java. If the src/main/java directory not exists, create it by hand.

package com.shengwang.demo;

import java.io.IOException;
import java.io.PrintWriter;
import javax.servlet.ServletException;
import javax.servlet.annotation.WebServlet;
import javax.servlet.http.HttpServlet;
import javax.servlet.http.HttpServletRequest;
import javax.servlet.http.HttpServletResponse;


@WebServlet(name = "helloServlet", urlPatterns = { "/hello" })
public class HelloServlet extends HttpServlet {
private static final long serialVersionUID = 1L;

@Override
protected void doGet(HttpServletRequest req, HttpServletResponse resp) throws ServletException, IOException {
PrintWriter out = resp.getWriter();
out.printf("%s", "hello world from a JEE servlet");
out.flush();
}
}

This class use JEE annotation @WebServlet to provide http service at url localhost:8080/context_name/urlPattern . context_name is set in pom.xml by <finalName>, urlPattern is the urlPattern set in Java code. So for this demo the url is http://localhost:8080/jee-servlet-demo/hello


All done, now this 3-files project hierarchy looks like:


image


6. Run


Use maven command line to auto deploy our servlet to the local GlassFish server.

mvn clean verify cargo:run

The console output looks like below, the cargo maven plugin will start server and deploy automatically.


image


Now access our hello world level JEE servlet by browser.


image


Now if you open admin console of GlassFish, you can see our demo is correctly deployed. (Login required, default user is 'admin', default password is 'adminadmin' for cargo plugin)


image

Friday, October 30, 2015

How to use embedded Java DB (Derby) in maven project

For now, Java DB is actually just Apache Derby with a different name.  In the following of the article, we will call it Derby. It  comes with JDK installation. ( Although what's normally used in maven project is not the same binary install in local JDK directory)

Using embedded Java DB means the database will run in the same JVM as your application. The Java DB engine actually gets started when you try to connect to it by JDBC. When the application exits, the database also exits. If you choose to run the Java DB total in memory, when the JVM stops, the data will be gone. Or you can choose to store the data on local file system to make them usable during multiple runs.

Java DB (Derby) is mostly used for convenience in development. No external database is needed even you have code need to play with RMDB.

0. What you need

  • JDK 6+ (JDK 7 in this demo)
  • Maven 3.2 +

1. POM file

There's only one dependency needed to use Derby database.

<project xmlns="http://maven.apache.org/POM/4.0.0" xmlns:xsi="http://www.w3.org/2001/XMLSchema-instance"
xsi:schemaLocation="http://maven.apache.org/POM/4.0.0 http://maven.apache.org/xsd/maven-4.0.0.xsd">
<modelVersion>4.0.0</modelVersion>

<groupId>com.shengwang.demo</groupId>
<artifactId>javadb-derby-embedded-basic</artifactId>
<version>1.0</version>
<packaging>jar</packaging>

<name>javadb-derby-embedded-basic</name>
<url>http://maven.apache.org</url>

<dependencies>
<dependency>
<groupId>org.apache.derby</groupId>
<artifactId>derby</artifactId>
<version>10.8.3.0</version>
</dependency>
</dependencies>

<!-- Use Java 1.7 -->
<build>
<plugins>
<plugin>
<groupId>org.apache.maven.plugins</groupId>
<artifactId>maven-compiler-plugin</artifactId>
<version>2.5.1</version>
<configuration>
<source>1.7</source>
<target>1.7</target>
</configuration>
</plugin>
</plugins>
</build>
</project>

Since the version of Java DB comes with JDK 7 is 10.8.3.x, we also use 10.8.3.0 in our maven project. If just using in-memory database(see below), the version used in maven actually doesn't matter. But if database file stores on file system and you want to check the database content after application finishes, you'd better use the same version as from JDK, so the 'ij' tool in $JAVA_HOME/db/bin can open the database without version conflicts.


2. When the embedded database starts


The database starts when you java code try to connect to it by using standard JDBC. How the derby work depends on the way to connect to it, or in other words, depends on the connection url. Suppose we need to connect to a database named 'demo'.


In-memory database, url looks like: jdbc:derby:memory:demo;create=true


'demo' is the database name and can be any string you choose, "memory" is a key word to tell Derby  to goes to all-in-memory mode.


File-based database, url looks like: jdbc:derby:c:\Users\shengw\MyDB\demo;create=true


'c:\Users\shengw\MyDB\demo' is the directory to save database files on local file system. (On windows its actually jdbc:derby:c:\\Users\\shengw\\MyDB\\demo;create=true because of the String escaping)


'create=true' is a Derby connection attribute to create the database if it doesn't exist. If use in-memory database, this attribute is mandatory.


3. A complete example


This is a complete hello world level example using embedded Derby database in Maven project. The HelloJavaDb.java lists below.

package com.shengwang.demo;

import java.sql.Connection;
import java.sql.DriverManager;
import java.sql.ResultSet;
import java.sql.SQLException;
import java.sql.Statement;

public class HelloJavaDb {
Connection conn;

public static void main(String[] args) throws SQLException {
HelloJavaDb app = new HelloJavaDb();

app.connectionToDerby();
app.normalDbUsage();
}

public void connectionToDerby() throws SQLException {
// -------------------------------------------
// URL format is
// jdbc:derby:<local directory to save data>
// -------------------------------------------
String dbUrl = "jdbc:derby:c:\\Users\\shengw\\MyDB\\demo;create=true";
conn = DriverManager.getConnection(dbUrl);
}

public void normalDbUsage() throws SQLException {
Statement stmt = conn.createStatement();

// drop table
// stmt.executeUpdate("Drop Table users");

// create table
stmt.executeUpdate("Create table users (id int primary key, name varchar(30))");

// insert 2 rows
stmt.executeUpdate("insert into users values (1,'tom')");
stmt.executeUpdate("insert into users values (2,'peter')");

// query
ResultSet rs = stmt.executeQuery("SELECT * FROM users");

// print out query result
while (rs.next()) {
System.out.printf("%d\t%s\n", rs.getInt("id"), rs.getString("name"));
}
}
}

The demo uses derby database, creates a table 'users', inserts 2 rows into the table and prints the query result set.  The whole maven project hierarchy is :


image


After running the HelloJavaDb example, you can verify the database, because we are not using derby in all-in-memory mode.  After running, the database files will appear on local file system like this. 


image


If you connect to the database in command line, you can see the 2 rows add from your Java code. 'ij' is a tool provided by Derby works as a sql client.


image

Monday, September 14, 2015

How to setup Spring MVC project with maven in Eclipse

There article shows how to create a spring MVC project with maven in Eclipse. The eclipse comes with an internal maven-archetype-webapp for webapps, but is somehow a little bit out of date. The project created by that needs some extra work to make it workable.

In this demo a maven managed Spring MVC helloworld  webapp is created in Eclipse. This demo doesn’t try to show how to use Spring MVC, but focus on how to set up the development environment in Eclipse.

0. What you need

  • JDK 1.7 +
  • Eclipse IDE for Jave EE (version 4.4 Luna)
  • Maven 3.2.1

1. Create a maven project in Eclipse

Create a new maven project.

image

Make sure choose the archetype maven-archetype-webapp

image

Then next until finish. You may notice that the new created project has errors. In Eclipse IDE, it has red crosses like below.

image

Don’t worry about that, we will deal with the errors step by step until it becomes a runnable one.

2. Configure the project

There are several things need to be changed for the eclipse created project.

2.1 Configure maven pom.xml

Since this is a maven managed project, the JDK version need to be set in pom.xml, not in Eclipse. The dependency Spring MVC is also added to pom.xml

<project xmlns="http://maven.apache.org/POM/4.0.0" 
xmlns:xsi="http://www.w3.org/2001/XMLSchema-instance"
xsi:schemaLocation="http://maven.apache.org/POM/4.0.0
http://maven.apache.org/maven-v4_0_0.xsd">
<modelVersion>4.0.0</modelVersion>
<groupId>com.shengwang.demo</groupId>
<artifactId>spring-mvc-helloworld</artifactId>
<packaging>war</packaging>
<version>1.0</version>
<name>spring-mvc-helloworld Maven Webapp</name>
<url>http://maven.apache.org</url>

<dependencies>
<!-- Use Spring MVC -->
<dependency>
<groupId>org.springframework</groupId>
<artifactId>spring-webmvc</artifactId>
<version>4.1.6.RELEASE</version>
</dependency>
</dependencies>

<build>
<finalName>spring-mvc-helloworld</finalName>
<!-- Use Java 1.7 -->
<plugins>
<plugin>
<groupId>org.apache.maven.plugins</groupId>
<artifactId>maven-compiler-plugin</artifactId>
<version>2.5.1</version>
<configuration>
<source>1.7</source>
<target>1.7</target>
</configuration>
</plugin>
</plugins>
</build>
</project>

After pom.xml saved and use Alt-F5 to update the maven project, Eclipse still complain about an error for the project like below.


It’s a error about “javax.servlet.http.HttpServlet” was not found on the Java Build Path.


image


Don’t worry, The class should be provided by the Servlet containers, such as Tomcat, we need to do more configuration for the running environment of the project. So let deal with it now.


2.2 Configure Dynamic Web Module for project


It’s a little bit tricky to change Dynamic Web Module version in Eclipse, first you need to unset the default old version 2.3 in project facets, then set it again with new version 3.0 or higher. Direct change the version number will cause an error in Eclipse like this.


image


So let do it in the correct way, unset the old one, then set it again with new version.


Right click on the project name – > choose properties. Uncheck the Dynamic Web Module 2.3, then hit OK to confirm.


image


Again, right click on the project name – > choose properties. Check the Dynamic Web Module 3.0, Also set specify a runtime server for the our helloworld webapp.


image


Now our helloworld Spring MVC web app don’t have any errors in Eclipse.


image


2.3 Add java directory


The wizard created project don’t have directory for java code, we need to create this directory by hand. Like other maven project,  /src/main/java is the folder need to be created to put the java code.

Now if you continue to proceed this tutorial, configure web.xml and dispatcher-servlet.xml, you will end up with a spring mvc project with configuration in XML file. If you prefer to have a spring mvc project with java-based configuration, you can skip the rest of this article and jump to another tuorial on Java-based Spring mvc configuration - without Spring security


2.4  basic web.xml configuration


Change the default /src/main/webapp/WEB-INF/web.xml to the basic configuration below .

<web-app xmlns="http://java.sun.com/xml/ns/javaee" 
xmlns:xsi="http://www.w3.org/2001/XMLSchema-instance"
xsi:schemaLocation="http://java.sun.com/xml/ns/javaee
http://java.sun.com/xml/ns/javaee/web-app_3_0.xsd"
version="3.0">

<display-name>Demo for mvc hello world config</display-name>

<servlet>
<servlet-name>dispatcher</servlet-name>
<servlet-class>org.springframework.web.servlet.DispatcherServlet</servlet-class>
<!-- specify location of spring config, don't use default --> <init-param> <param-name>contextConfigLocation</param-name> <param-value>classpath:dispatcher-servlet.xml</param-value> </init-param> <load-on-startup>1</load-on-startup>
</servlet>
<servlet-mapping>
<servlet-name>dispatcher</servlet-name>
<url-pattern>/</url-pattern>
</servlet-mapping>

</web-app>

The version="3.0" means using servlet version 3.0. the Spring configuration file is name "dispatcher-servlet.xml" in classpath, usually means /src/main/resources/dispatcher-servlet.xml. Just remember don't use the default value for contextconfigLocation, which will be /src/main/webapp/WEB-INF by default, to avoid hitting rocks when doing integration test later.


2.5 basic spring configuration


Add a new file /src/main/resources/dispatcher-servlet.xml. In the same directory as web.xml, the basic spring configuration looks like below.

<?xml version="1.0" encoding="UTF-8"?>
<beans xmlns="http://www.springframework.org/schema/beans"
xmlns:xsi="http://www.w3.org/2001/XMLSchema-instance"
xmlns:beans="http://www.springframework.org/schema/beans"
xmlns:context="http://www.springframework.org/schema/context"
xmlns:mvc="http://www.springframework.org/schema/mvc"
xsi:schemaLocation="
http://www.springframework.org/schema/beans
http://www.springframework.org/schema/beans/spring-beans.xsd
http://www.springframework.org/schema/context
http://www.springframework.org/schema/context/spring-context.xsd
http://www.springframework.org/schema/mvc
http://www.springframework.org/schema/mvc/spring-mvc.xsd">

<context:component-scan base-package="com.shengwang.demo" />

<mvc:annotation-driven/>

<!-- ================================== -->
<!-- 1. mapping static resources -->
<!-- ================================== -->
<mvc:resources location="/static-resources/css/" mapping="/css/**" cache-period="3600"/>
<mvc:resources location="/static-resources/img/" mapping="/img/**" cache-period="3600"/>
<mvc:resources location="/static-resources/js/" mapping="/js/**" cache-period="3600"/>


<!-- ================================== -->
<!-- 2. view resolver for JSP -->
<!-- ================================== -->
<bean id="viewResolver"
class="org.springframework.web.servlet.view.InternalResourceViewResolver">
<property name="prefix" value="/WEB-INF/"/>
<property name="suffix" value=".jsp"/>
</bean>
</beans>

Change the base package to your own. In this demo it’s com.shengwang.demo. The static resources directory can be any directories relative to /src/main/webapp


Now the project looks like this.

image

Since this article focuses on how to setup project and development environment for spring mvc with maven in Eclipse. The spring mvc coding part, such controllers and business logic are omitted. Now your maven managed Spring MVC project is setup in Eclipse, ready for some java code and run.


Happy coding!

Wednesday, August 19, 2015

Maven Dependencies for JEE 7

A brief maven dependencies list for JEE7 related applications. The table below originally published by glassfish wiki

Component maven
Java EE 7 Full Platform JSR 342

<dependency>
   <groupId>javax</groupId> 
    <artifactId>javaee-api</artifactId> 
    <version>7.0</version>
</dependency>

Java EE 7 Web Profie

<dependency>
   <groupId>javax</groupId>  
    <artifactId>javaee-web-api</artifactId>  
    <version>7.0</version>
</dependency>

Concurrency Utilities for Java EE (JSR 236)

<dependency>
    <groupId>javax.enterprise.concurrent</groupId>
    <artifactId>javax.enterprise.concurrent-api</artifactId>
    <version>1.0</version>      
</dependency>

Java Persistence API 2.1 (JSR 338)

<dependency>
  <groupId>org.eclipse.persistence</groupId>
    <artifactId>javax.persistence</artifactId>
    <version>2.1.0</version></dependency>

Java API for RESTful Web Services 2.0 (JSR 339)

<dependency>
    <groupId>javax.ws.rs</groupId>
    <artifactId>javax.ws.rs-api</artifactId>
    <version>2.0</version>
</dependency>

Servlets 3.1 (JSR 340)

<dependency>
    <groupId>javax.servlet</groupId>
    <artifactId>javax.servlet-api</artifactId>
    <version>3.1.0</version>
</dependency>

Expression Language 3.0 (JSR 341)

<dependency>
    <groupId>javax.el</groupId>
    <artifactId>javax.el-api</artifactId>
    <version>3.0.0</version>
<dependency>

Java Message Service 2.0 (JSR 343)

<dependency>
    <groupId>javax.jms</groupId>
    <artifactId>javax.jms-api</artifactId>
    <version>2.0</version>
</dependency>

JavaServer Faces 2.2 (JSR 344)

<dependency>
    <groupId>javax.faces</groupId>
    <artifactId>javax.faces-api</artifactId>
    <version>2.2</version>
</dependency>

Enterprise JavaBeans 3.2 (JSR 345)

<dependency>
    <groupId>javax.ejb</groupId>
    <artifactId>javax.ejb-api</artifactId>
    <version>3.2</version>
</dependency>

Context & Dependency Injection 1.1 (JSR 346)

<dependency>
    <groupId>javax.enterprise</groupId>
    <artifactId>cdi-api</artifactId>
    <version>1.1</version>
</dependency>

Bean Validation 1.1 (JSR 349)

<dependency>
    <groupId>javax.validation</groupId>
    <artifactId>validation-api</artifactId>
    <version>1.1.0.Final</version>
</dependency>

Batch Applications for the Java Platform (JSR 352)

<dependency>
    <groupId>javax.batch</groupId>
    <artifactId>javax.batch-api</artifactId>
    <version>1.0</version>
</dependency>

Java API for JSON Processing (JSR 353)

<dependency>
    <groupId>javax.json</groupId>
    <artifactId>javax.json-api</artifactId>
    <version>1.0</version>
</dependency>

Java API for WebSocket (JSR 356)

<dependency>
    <groupId>javax.websocket</groupId>
    <artifactId>javax.websocket-api</artifactId>
    <version>1.0</version>          
</dependency>

Java Transaction API 1.2 (JSR 907)

<dependency>
    <groupId>javax.transaction</groupId>
    <artifactId>javax.transaction-api</artifactId>
    <version>1.2</version>           
</dependency>

Java EE Connector Architecture 1.7  (JSR 322)

<dependency>
  <groupId>javax.resource</groupId>
  <artifactId>javax.resource-api</artifactId>
  <version>1.7</version>
</dependency>

Powered by Blogger.

About The Author

My Photo
Has been a senior software developer, project manager for 10+ years. Dedicate himself to Alcatel-Lucent and China Telecom for delivering software solutions.

Pages

Unordered List